Creating beautiful gradient backgrounds is the easiest way to improve your app’s UI. Most developers use BoxDecoration for gradients. It is simple and quick. However, BoxDecoration has limits when you need more control and better performance.
In this guide, you will learn how to create a custom gradient background using CustomPainter. This method helps you build dynamic and rich designs.
By the end of this tutorial, you will understand:
- How Flutter renders gradients.
- When to move beyond
BoxDecoration. - How to build a reusable background for your apps.
The Problem with BoxDecoration
If you have used Flutter, you have likely used BoxDecoration. It works well for basic designs. But as your UI gets more advanced, you will notice some problems.
With BoxDecoration, you are stuck with basic types like linear or radial gradients. These are useful, but they are not flexible. You cannot easily create layered effects or complex styles.
Another issue is control. You cannot change how the gradient is painted on the canvas. This makes it hard to build mesh gradients, moving backgrounds, or custom light effects.
This is why we use CustomPainter. It gives you full control. You can decide exactly how to draw on the screen. It is the best way to create high-performance, custom backgrounds.
In the next section, we will start building our gradient step by step.
Want to Build Beautiful Flutter Apps?
Get the free Build Your First Android App video class and learn Flutter through practical, beginner-friendly projects.
Step 1: Create and Open Your Project
First, let’s set up a new project. We will name it flutter_gradient. Open your terminal on your desktop and type:
flutter create flutter_gradientOnce the project is ready, move into the folder and open it with VS Code. Type these commands:
cd flutter_gradient
code .
This will launch VS Code with your new Flutter project loaded and ready to go.
Step 2: Clean Your Code and Set Up the App Structure
Now, open the lib/main.dart file. Delete all the existing code. We will write everything from scratch so you can see how it works.
Once the file is empty, add the following code:
// main.dart
import 'package:flutter/material.dart';

void main() {
  runApp(const MyApp());
}

class MyApp extends StatelessWidget {
  const MyApp({super.key});

  @override
  Widget build(BuildContext context) {
    return MaterialApp(
      title: 'Gradient',
      debugShowCheckedModeBanner: false,
      theme: ThemeData.dark().copyWith(
        // We are using a dark blue background for now
        scaffoldBackgroundColor: Colors.blueGrey,
      ),
      home: const HomeScreen(),
    );
  }
}
Code language: JavaScript (javascript)
You will notice an error on HomeScreen. This is because we haven’t created it yet. We will do that in the next step.
The scaffoldBackgroundColor is set to a dark color for now. This acts as a placeholder until we draw our custom gradient.
Step 3: Create the Home Screen and Organize Folders
It is important to keep your project organized. First, let’s create a new folder and a file for our UI.
Inside your lib folder, create a new folder named screens. Inside that folder, create a file named home_screen.dart.
Your folder structure should now look like this:
lib/
 └── screens/
      └── home_screen.dart
 └── main.dart
Setting up the Home Screen
Open home_screen.dart and add a StatefulWidget. This will be the main page of our app:
// home_screen.dart
import 'package:flutter/material.dart';

class HomeScreen extends StatefulWidget {
  const HomeScreen({super.key});

  @override
  State<HomeScreen> createState() => _HomeScreenState();
}

class _HomeScreenState extends State<HomeScreen> {
  @override
  Widget build(BuildContext context) {
    return const Scaffold();
  }
}
Code language: JavaScript (javascript)
Link the Files
Now, go back to your main.dart file. You need to tell it where to find the HomeScreen. Add this import at the top of the file:
// main.dart
import 'package:flutter/material.dart';
import 'package:flutter_gradient/screens/home_screen.dart';
Code language: JavaScript (javascript)
Once you add the import, the red error under HomeScreen will disappear. Your project is now linked and ready for the custom drawing!
Step 4: Set Up the Background Layer
Now, let’s get the app running so we can see our progress. It is often faster to run your app as a Windows application during development. In VS Code, look for the small play button at the top right of your main.dart file and click it.
Once the app is running, you will see a blank dark screen. Now, let’s start building the layout.
Adding a Stack
Go to home_screen.dart. Inside the Scaffold, we will add a Stack widget. A Stack allows you to place widgets on top of each other. Since our gradient is a background, it needs to be the bottom layer.
class _HomeScreenState extends State<HomeScreen> {
  @override
  Widget build(BuildContext context) {
    return const Scaffold(
      body: Stack(
        children: [
          // We will add our background here
        ],
      ),
    );
  }
}
Code language: JavaScript (javascript)
Create the Background Widget
To keep our code clean, let’s create a separate folder for our widgets. Inside the lib folder, create a new folder called widgets. Inside that folder, create a file named custom_background.dart.
Add this code to your new file:
// custom_background.dart
import 'package:flutter/material.dart';

class CustomBackground extends StatelessWidget {
  const CustomBackground({super.key});

  @override
  Widget build(BuildContext context) {
    // CustomPaint is where the magic happens
    return const CustomPaint();
  }
}
Code language: JavaScript (javascript)
Place the Background in the Stack
Now, go back to home_screen.dart and add the CustomBackground to your Stack. We use Positioned.fill to make sure the background covers the entire screen.
import 'package:flutter/material.dart';
// Import your widget
import 'package:flutter_gradient/widgets/custom_background.dart';

// ... inside the build method
    return Scaffold(
      body: Stack(
        children: [
          Positioned.fill(
            child: const CustomBackground(),
          ),
        ],
      ),
    );
Code language: JavaScript (javascript)
Everything is now set up! In the next step, we will finally start painting the custom gradient onto the canvas.
Step 5: Create the Mesh Painter
Now, let’s go into custom_background.dart and start working on our background. Inside the return, we will call a custom painter named _MeshPainter().
@override
Widget build(BuildContext context) {
  return CustomPaint(
    painter: _MeshPainter(),
  );
}
Code language: CSS (css)
Now we need to create that class. Right after your StatelessWidget, add the _MeshPainter class:
class _MeshPainter extends CustomPainter {
  @override
  void paint(Canvas canvas, Size size) {
    // We will add our custom gradient here
  }

  @override
  bool shouldRepaint(covariant CustomPainter oldDelegate) => false;
}
Code language: JavaScript (javascript)
Setting up the Paint Object
Inside the paint method, the first thing we need is a Paint object. This object acts like our brush.
void paint(Canvas canvas, Size size) {
  final paint = Paint();
}
Code language: JavaScript (javascript)
Adding the Shader
Now we can work with our paint object. We will add a shader that uses a RadialGradient.
final paint = Paint()
  ..shader = RadialGradient(
    colors: colors, // We will define 'colors' in the next step
  ).createShader(Rect.fromLTWH(0, 0, size.width, size.height));
Code language: PHP (php)
In this step, we created a Shader. We used Rect.fromLTWH to make sure the gradient fits the full width and height of the screen. We haven’t defined the colors variable yet—we will handle that in the next step!
Step 6: Add Colors and Draw the Gradient
Now, let’s define the colors, the position of the gradient, and how far it spreads.
We will update our paint object with specific color names, an alignment to move the center of the gradient, and a radius.
final paint = Paint()
  ..shader = RadialGradient(
    colors: [Colors.blue, Colors.deepPurple], // Using clear color names
    center: const Alignment(-0.8, -0.6), // Moves the center point
    radius: 1.5, // Sets the spread of the gradient
  ).createShader(Rect.fromLTWH(0, 0, size.width, size.height));
Code language: PHP (php)
Making it Visible
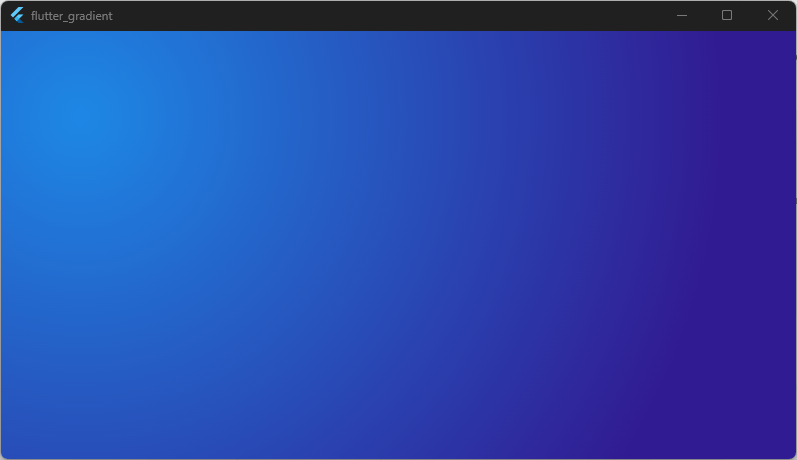
Right now, the code knows how to paint, but it hasn’t drawn anything yet. To make the gradient appear on the screen, we use canvas.drawRect.
Add this line right after your paint object:
canvas.drawRect(Rect.fromLTWH(0, 0, size.width, size.height), paint);
Code language: CSS (css)
By drawing a rectangle that matches the full width and height of the screen, our gradient will now fill the entire background. If you check your app now, you should see a beautiful, smooth transition between blue and purple!
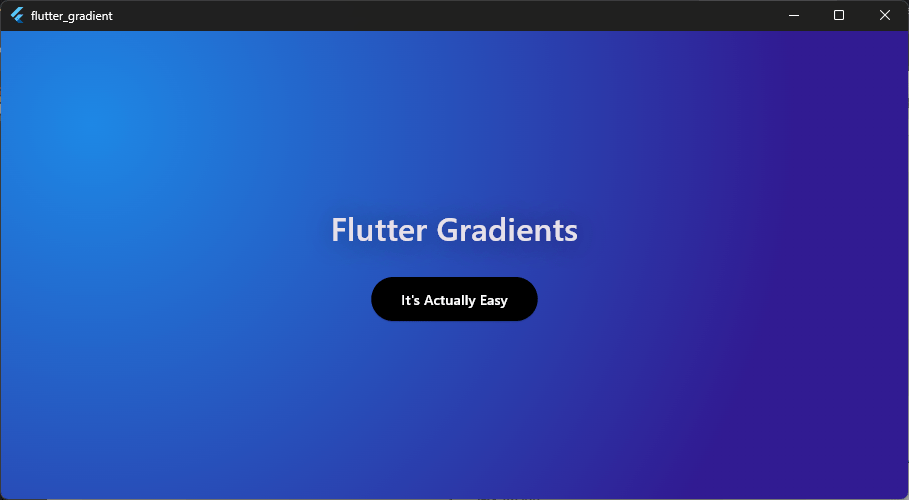
Step 7: Add Content Over Your Gradient
To finish our design, let’s add some text and a button. We will place these inside a Column within our Stack. Because the CustomBackground is the first item in the Stack, it will stay in the background while our text sits on top.
Adding the Text
Go back to home_screen.dart. We will add a Center and a Text widget. We are also adding a subtle shadow to the text to make it pop against the colorful background.
body: Stack(
  children: [
    const Positioned.fill(child: CustomBackground()),
    Column(
      crossAxisAlignment: CrossAxisAlignment.center,
      mainAxisAlignment: MainAxisAlignment.center,
      children: [
        Center(
          child: Text(
            'Flutter Gradients',
            style: TextStyle(
              fontSize: 32,
              fontWeight: FontWeight.w500,
              height: 1.2,
              shadows: [
                Shadow(
                  blurRadius: 25.0,
                  color: Colors.black.withValues(alpha: 0.5),
                  offset: const Offset(2.0, 2.0),
                ),
              ],
            ),
            textAlign: TextAlign.center,
          ),
        ),
      ],
    ),
  ],
),
Code language: JavaScript (javascript)
Adding the Button
Now, let’s add an ElevatedButton below the text. We will use a SizedBox to create some breathing room between the two elements.
const SizedBox(height: 30),

ElevatedButton(
  onPressed: () {},
  style: ElevatedButton.styleFrom(
    padding: const EdgeInsets.symmetric(
      horizontal: 30,
      vertical: 20,
    ),
    backgroundColor: Colors.black,
    foregroundColor: Colors.white,
  ),
  child: const Text('It\'s Actually Easy'),
),
Code language: JavaScript (javascript)
Now, your app should look like this:
Conclusion
Congratulations! You have successfully built a custom gradient background in Flutter using CustomPainter.
While BoxDecoration is great for simple tasks, using CustomPainter gives you the freedom to create unique, high-performance designs. You now know how to set up a canvas, create a shader with RadialGradient, and draw it directly to the screen.
Try experimenting with different colors, radii, or even multiple gradients to create your own unique mesh look!
Great Apps Don’t Just Work. They Feel Professional.
Get the free Build Your First Android App video class and learn how to create beautiful Flutter apps through real-world projects.