Master Flutter form validation with TextFormField, validators, email and password validation, form state management, and production-ready best practices.
You build a form. You add a few text fields. Everything looks great. Then real users start using it.
Someone leaves a required field empty. Another enters an invalid email address. Someone else creates a password that’s too short. Suddenly, your beautiful form starts collecting bad data.
This is why form validation matters.
Good validation helps users enter correct information before they submit a form. It reduces errors, improves user experience, and makes your app feel more professional. Whether you’re building a login screen, registration form, profile page, or checkout flow, validation is an essential part of the process.
Flutter gives you several ways to validate user input. You can use built-in validators with TextFormField, create custom validation logic, or even validate input without using a Form widget at all. The best approach depends on your app and the experience you want to create.
In this guide, you’ll learn how to handle form validation in Flutter step by step. We’ll cover required fields, email and password validation, real-time feedback, helpful error messages, form state management, and common mistakes that beginners often make.
By the end, you’ll know how to build Flutter forms that work reliably in real-world apps—not just in simple tutorials.
Before we dive into validation techniques, it’s important to understand why validation plays such a critical role in every Flutter application.
- Master Flutter form validation with TextFormField, validators, email and password validation, form state management, and production-ready best practices.
- Why Validation Matters
- TextField vs TextFormField Validation
- Validation Without Form Widgets
- Required Field Validation
- Email Validation
- Password Validation
- Real-Time Validation
- Showing Helpful Error Messages
- Clearing Fields Correctly
- Managing Form State
- Preventing Common Validation Bugs
Why Validation Matters
Imagine you’re building a registration form. A user enters their name, forgets to add an email address, and taps the Sign Up button. What happens next?
Without validation, the form might submit incomplete or incorrect data. This can create problems for both users and your application.
Validation acts as a safety check. It ensures that users enter the right information before a form is submitted.
Benefits of Validation
Good validation helps you:
- Prevent empty or invalid submissions
- Improve the user experience
- Reduce errors in your database
- Guide users to fix mistakes quickly
- Build trust in your app
For example, if a user enters john@gmail instead of john@gmail.com, validation can immediately show an error message and help them correct it.
A Real-World Example
Think about a login form.
The email field should contain a valid email address.
The password field should not be empty.
If validation is missing, users may submit incorrect information and receive confusing errors from the server later. A better experience is to catch these issues before the form is submitted.
if (emailController.text.isEmpty) {
  // Show error message
}
Code language: Dart (dart)
Even this simple check can prevent many common mistakes.
Validation Improves User Experience
Validation is not just about protecting your data. It’s also about helping users succeed.
When users receive clear feedback, they can quickly understand what went wrong and how to fix it. This reduces frustration and makes your app feel more polished.
The goal is simple:
Help users enter correct information with as little effort as possible.
If you’re new to building forms in Flutter, our Flutter Registration Form Tutorial walks through creating a complete registration screen with validation, input fields, and user-friendly error handling.
Flutter provides several ways to validate user input, and the most common approach is using TextFormField with built-in validators. In the next section, we’ll compare TextField and TextFormField to understand which one is best for form validation.
TextField vs TextFormField Validation
When building forms in Flutter, you’ll usually work with either TextField or TextFormField. At first glance, they look very similar.
Both allow users to enter text.
Both support controllers, styling, and keyboard options.
The difference is validation.
TextField
TextField does not have a built-in validator. If you want to validate input, you must write the validation logic yourself. This gives you more control, but it also means more code.
Here’s a complete example that checks whether a field is empty when the user taps a button:
import 'package:flutter/material.dart';

void main() {
  runApp(const MyApp());
}

class MyApp extends StatelessWidget {
  const MyApp({super.key});

  @override
  Widget build(BuildContext context) {
    return MaterialApp(
      title: 'TextField Practice',
      debugShowCheckedModeBanner: false,
      theme: ThemeData(
        useMaterial3: true,
        colorSchemeSeed: Colors.blue,
        brightness: Brightness.light,
      ),
      home: const HomeScreen(),
    );
  }
}

class HomeScreen extends StatefulWidget {
  const HomeScreen({super.key});

  @override
  State<HomeScreen> createState() => _HomeScreenState();
}

class _HomeScreenState extends State<HomeScreen> {
  final TextEditingController nameController = TextEditingController();
  String? errorText;

  void validateField() {
    setState(() {
      if (nameController.text.trim().isEmpty) {
        errorText = 'Name is required';
      } else {
        errorText = null;
      }
    });
  }

  @override
  Widget build(BuildContext context) {
    final theme = Theme.of(context);

    return Scaffold(
      appBar: AppBar(
        title: const Text('TextField Validation'),
        backgroundColor: theme.colorScheme.primary,
        foregroundColor: theme.colorScheme.onPrimary,
      ),
      body: Padding(
        padding: const EdgeInsets.all(16),
        child: Column(
          children: [
            TextField(
              controller: nameController,
              decoration: InputDecoration(
                labelText: 'Name',
                errorText: errorText,
              ),
            ),
            const SizedBox(height: 16),
            ElevatedButton(
              onPressed: validateField,
              child: const Text('Submit'),
            ),
          ],
        ),
      ),
    );
  }
}
Code language: Dart (dart)
In this example, the button triggers validation manually. If the field is empty, an error message appears below the TextField.
TextFormField
TextFormField was designed specifically for forms. It includes a built-in validator property that works with Flutter’s Form widget. This makes validation much easier to manage.
Here’s a complete working example:
import 'package:flutter/material.dart';
void main() {
runApp(const MyApp());
}
class MyApp extends StatelessWidget {
const MyApp({super.key});
@override
Widget build(BuildContext context) {
return MaterialApp(
title: 'TextField Practice',
debugShowCheckedModeBanner: false,
theme: ThemeData(
useMaterial3: true,
colorSchemeSeed: Colors.blue,
brightness: Brightness.light,
),
home: const HomeScreen(),
);
}
}
class HomeScreen extends StatefulWidget {
const HomeScreen({super.key});
@override
State<HomeScreen> createState() => _HomeScreenState();
}
class _HomeScreenState extends State<HomeScreen> {
final _formKey = GlobalKey<FormState>();
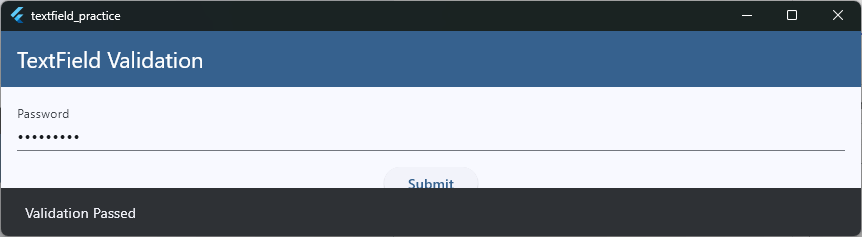
void submitForm() {
if (_formKey.currentState!.validate()) {
ScaffoldMessenger.of(
context,
).showSnackBar(const SnackBar(content: Text('Validation Passed')));
}
}
@override
Widget build(BuildContext context) {
final theme = Theme.of(context);
return Scaffold(
appBar: AppBar(
title: const Text('TextField Validation'),
backgroundColor: theme.colorScheme.primary,
foregroundColor: theme.colorScheme.onPrimary,
),
body: Padding(
padding: const EdgeInsets.all(16),
child: Column(
children: [
Form(
key: _formKey,
child: Column(
children: [
TextFormField(
decoration: const InputDecoration(labelText: 'Name'),
validator: (value) {
if (value == null || value.trim().isEmpty) {
return 'Name is required';
}
return null;
},
),
const SizedBox(height: 16),
ElevatedButton(
onPressed: submitForm,
child: const Text('Submit'),
),
],
),
),
],
),
),
);
}
}
Code language: Dart (dart)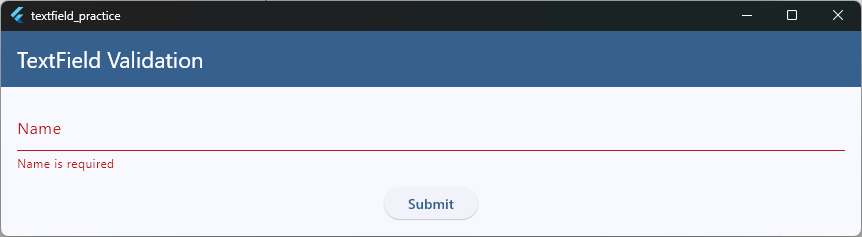
When the button is pressed, validate() runs all validators inside the form. If any field fails validation, Flutter automatically displays the error message.
Which One Should You Use?
For most forms, TextFormField is the better choice.
Use TextFormField when:
- Building login forms
- Creating registration screens
- Working with multiple inputs
- Using a
Formwidget - Needing built-in validation
Use TextField when:
- You need custom validation logic
- You’re not using a
Formwidget - You’re building highly customized input experiences
A good rule for beginners is simple:
If you’re building a form, start with TextFormField. It requires less code and makes validation easier to manage.
If you’re new to Flutter forms, check out our Flutter TextField Fundamentals guide to learn how text input widgets work before adding validation.
Validation Without Form Widgets
Although Flutter’s Form and TextFormField widgets make validation easier, they’re not your only option. Sometimes you may want to validate input without using a Form widget at all.
This is common when:
- You only have one input field
- You’re building a search bar
- You’re creating a custom UI
- You prefer managing validation manually
- You’re working with a
TextField
Many developers refer to this approach as Flutter TextField validation without Form.
How It Works
Instead of using a validator, you check the field value yourself when the user performs an action, such as tapping a button. You can then display an error message if the input is invalid.
Complete Example
The example below validates a name field without using a Form widget.
import 'package:flutter/material.dart';

void main() {
  runApp(const MyApp());
}

class MyApp extends StatelessWidget {
  const MyApp({super.key});

  @override
  Widget build(BuildContext context) {
    return MaterialApp(
      title: 'TextField Practice',
      debugShowCheckedModeBanner: false,
      theme: ThemeData(
        useMaterial3: true,
        colorSchemeSeed: Colors.blue,
        brightness: Brightness.light,
      ),
      home: const HomeScreen(),
    );
  }
}

class HomeScreen extends StatefulWidget {
  const HomeScreen({super.key});

  @override
  State<HomeScreen> createState() => _HomeScreenState();
}

class _HomeScreenState extends State<HomeScreen> {
  final TextEditingController nameController = TextEditingController();

  String? errorText;

  void validateName() {
    setState(() {
      if (nameController.text.trim().isEmpty) {
        errorText = 'Please enter your name';
      } else {
        errorText = null;

        ScaffoldMessenger.of(
          context,
        ).showSnackBar(const SnackBar(content: Text('Validation Passed')));
      }
    });
  }

  @override
  Widget build(BuildContext context) {
    final theme = Theme.of(context);

    return Scaffold(
      appBar: AppBar(
        title: const Text('TextField Validation'),
        backgroundColor: theme.colorScheme.primary,
        foregroundColor: theme.colorScheme.onPrimary,
      ),
      body: Padding(
        padding: const EdgeInsets.all(16),
        child: Column(
          children: [
            TextField(
              controller: nameController,
              decoration: InputDecoration(
                labelText: 'Name',
                errorText: errorText,
              ),
            ),
            const SizedBox(height: 16),
            ElevatedButton(
              onPressed: validateName,
              child: const Text('Validate'),
            ),
          ],
        ),
      ),
    );
  }
}
Code language: Dart (dart)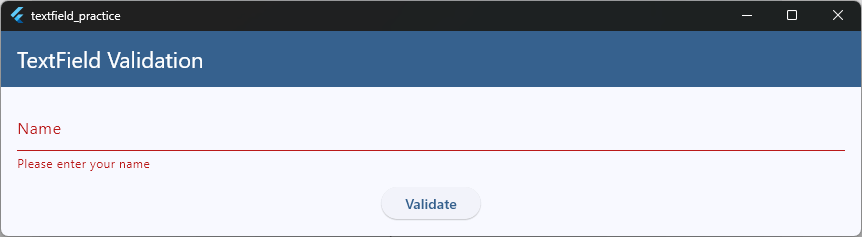
When the button is pressed, the app checks whether the field is empty. If it is, an error message appears below the TextField.
Validating While Users Type
You can also validate input using the onChanged callback.
TextField(
  decoration: InputDecoration(
    labelText: 'Name',
    errorText: errorText,
  ),
  onChanged: (value) {
    setState(() {
      errorText = value.trim().isEmpty
          ? 'Please enter your name'
          : null;
    });
  },
),
Code language: Dart (dart)
This provides immediate feedback without needing a submit button. We’ll look at this approach in more detail later when we discuss real-time validation.
When Should You Avoid This Approach?
Manual validation works well for simple screens.
However, if your form contains multiple fields such as:
- Name
- Password
- Confirm Password
Managing validation manually can quickly become difficult.
In those situations, using Form and TextFormField is usually cleaner and easier to maintain.
Which Approach Is Better?
For a single field or lightweight validation, using a TextField without a Form can be a good solution.
For larger forms, Flutter’s built-in form validation system is usually the better choice because it keeps your code organized and easier to scale.
If you’d like to see more validation patterns and practical examples, check out our Flutter Simple Form Validation Class, where we build reusable validation logic that can be applied across multiple forms.
Required Field Validation
One of the most common validation rules is checking whether a field is empty. This is called required field validation.
Before a user submits a form, you often want to make sure important fields contain a value.
Common examples include:
- Name
- Email address
- Password
- Phone number
- Username
If a required field is left empty, the app should display an error message and prevent form submission.
Using TextFormField
The easiest way to validate required fields in Flutter is with the validator property of a TextFormField.
Here’s a complete example:
import 'package:flutter/material.dart';

void main() {
  runApp(const MyApp());
}

class MyApp extends StatelessWidget {
  const MyApp({super.key});

  @override
  Widget build(BuildContext context) {
    return MaterialApp(
      title: 'TextField Practice',
      debugShowCheckedModeBanner: false,
      theme: ThemeData(
        useMaterial3: true,
        colorSchemeSeed: Colors.blue,
        brightness: Brightness.light,
      ),
      home: const HomeScreen(),
    );
  }
}

class HomeScreen extends StatefulWidget {
  const HomeScreen({super.key});

  @override
  State<HomeScreen> createState() => _HomeScreenState();
}

class _HomeScreenState extends State<HomeScreen> {
  final _formKey = GlobalKey<FormState>();

  void submitForm() {
    if (_formKey.currentState!.validate()) {
      ScaffoldMessenger.of(
        context,
      ).showSnackBar(const SnackBar(content: Text('Form Submitted')));
    }
  }

  @override
  Widget build(BuildContext context) {
    final theme = Theme.of(context);

    return Scaffold(
      appBar: AppBar(
        title: const Text('TextField Validation'),
        backgroundColor: theme.colorScheme.primary,
        foregroundColor: theme.colorScheme.onPrimary,
      ),
      body: Padding(
        padding: const EdgeInsets.all(16),
        child: Column(
          children: [
            Form(
              key: _formKey,
              child: Column(
                children: [
                  TextFormField(
                    decoration: const InputDecoration(labelText: 'Name'),
                    validator: (value) {
                      if (value == null || value.trim().isEmpty) {
                        return 'Name is required';
                      }
                      return null;
                    },
                  ),
                  const SizedBox(height: 16),
                  ElevatedButton(
                    onPressed: submitForm,
                    child: const Text('Submit'),
                  ),
                ],
              ),
            ),
          ],
        ),
      ),
    );
  }
}

Code language: Dart (dart)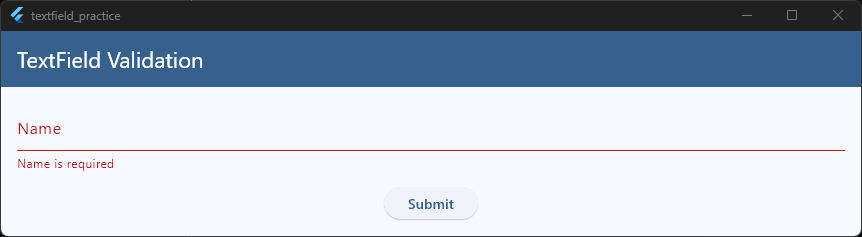
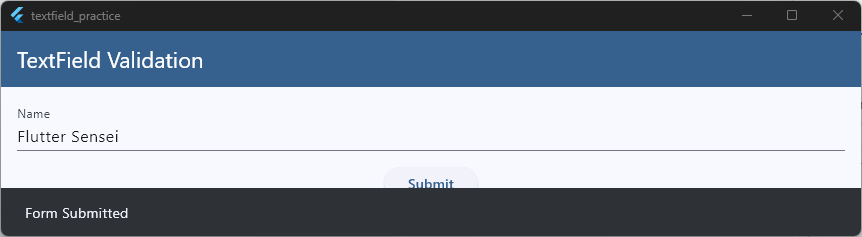
When the user taps the button, Flutter runs the validator. If the field is empty, the error message appears automatically below the input field.
Why Use trim()?
Notice that we used:
value.trim().isEmptyCode language: CSS (css)instead of:
value.isEmptyCode language: CSS (css)The trim() method removes extra spaces from the beginning and end of a string. Without trim(), a user could enter only spaces and still pass validation.
For example:
" "Code language: JSON / JSON with Comments (json)This looks empty to a user, but Flutter would treat it as valid text unless you use trim().
Creating a Reusable Required Validator
If you validate required fields often, you can create a reusable function.
String? requiredValidator(String? value, String fieldName) {
  if (value == null || value.trim().isEmpty) {
    return '$fieldName is required';
  }

  return null;
}
Code language: Dart (dart)
Then use it in any TextFormField:
TextFormField(
  decoration: const InputDecoration(labelText: 'Email'),
  validator: (value) => requiredValidator(value, 'Email'),
),
Code language: Dart (dart)
This helps keep your validation code clean and consistent across your app.
A Better User Experience
Required field validation should help users, not frustrate them. Keep error messages simple and specific.
Good:
- Name is required
- Email is required
- Password is required
Less helpful:
- Invalid input
- Error occurred
- Field cannot be empty
Clear messages make it easier for users to understand what needs to be fixed.
Required field validation is often the first check you perform. Once a field contains a value, you can apply additional rules such as email format validation, password requirements, or custom business logic.
Email Validation
Checking whether an email field is empty is a good start. However, a user could still enter something like:
helloor
john@gmailCode language: CSS (css)These values are not valid email addresses. That’s why most forms perform email validation before allowing users to continue.
A Complete Email Validation Example
The example below checks that:
- The email field is not empty
- The email follows a valid format
- The form only submits when validation passes
import 'package:flutter/material.dart';
void main() {
runApp(const MyApp());
}
class MyApp extends StatelessWidget {
const MyApp({super.key});
@override
Widget build(BuildContext context) {
return MaterialApp(
title: 'TextField Practice',
debugShowCheckedModeBanner: false,
theme: ThemeData(
useMaterial3: true,
colorSchemeSeed: Colors.blue,
brightness: Brightness.light,
),
home: const HomeScreen(),
);
}
}
class HomeScreen extends StatefulWidget {
const HomeScreen({super.key});
@override
State<HomeScreen> createState() => _HomeScreenState();
}
class _HomeScreenState extends State<HomeScreen> {
final _formKey = GlobalKey<FormState>();
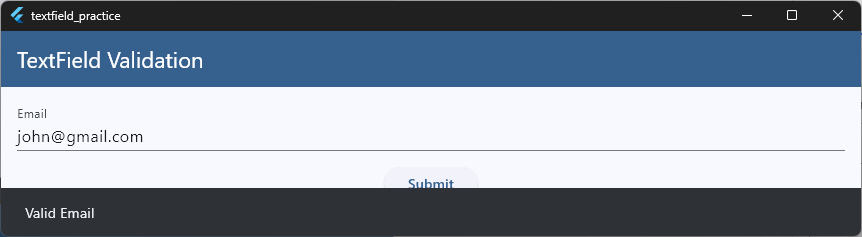
void submitForm() {
if (_formKey.currentState!.validate()) {
ScaffoldMessenger.of(
context,
).showSnackBar(const SnackBar(content: Text('Valid Email')));
}
}
@override
Widget build(BuildContext context) {
final theme = Theme.of(context);
return Scaffold(
appBar: AppBar(
title: const Text('TextField Validation'),
backgroundColor: theme.colorScheme.primary,
foregroundColor: theme.colorScheme.onPrimary,
),
body: Padding(
padding: const EdgeInsets.all(16),
child: Column(
children: [
Form(
key: _formKey,
child: Column(
children: [
TextFormField(
decoration: const InputDecoration(labelText: 'Email'),
keyboardType: TextInputType.emailAddress,
validator: (value) {
if (value == null || value.trim().isEmpty) {
return 'Email is required';
}
final emailRegex = RegExp(
r'^[\w-\.]+@([\w-]+\.)+[\w-]{2,4}$',
);
if (!emailRegex.hasMatch(value)) {
return 'Enter a valid email address';
}
return null;
},
),
const SizedBox(height: 16),
ElevatedButton(
onPressed: submitForm,
child: const Text('Submit'),
),
],
),
),
],
),
),
);
}
}
Code language: Dart (dart)
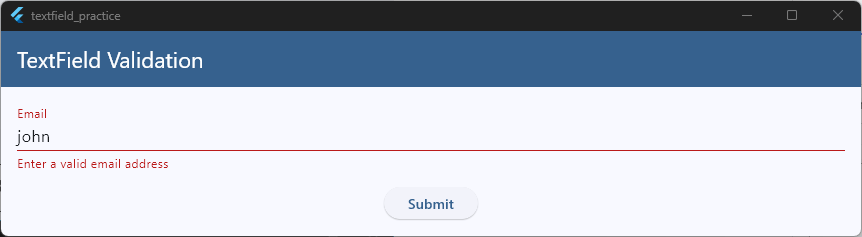
How the Validation Works
When the user taps the button, Flutter runs the validator.
The validator checks:
- Is the field empty?
- Does the text match a valid email pattern?
If either check fails, an error message appears below the field.
Examples
Valid emails:
john@gmail.com
sarah@example.org
alex123@yahoo.com
Code language: CSS (css)
Invalid emails:
john@gmail
hello
user@
@gmail.com
Code language: CSS (css)
Keep Error Messages Helpful
When email validation fails, tell users exactly what went wrong.
Good examples:
- Email is required
- Enter a valid email address
Avoid generic messages such as:
- Invalid input
- Error
- Something went wrong
Clear messages help users fix problems faster and create a better experience.
Email validation is often used together with password validation when building login and registration forms. In the next section, we’ll learn how to validate passwords and enforce basic security requirements.
If you’re building authentication screens, our Flutter Authentication UI guide shows how email and password fields work together in real-world login and signup flows.
Password Validation
Password validation helps ensure users create secure passwords when registering for your app. Without validation, users might create passwords such as:
123or
passwordThese passwords are easy to guess and provide very little security. A better approach is to require passwords that meet a few basic rules.
For example:
- Cannot be empty
- Must contain at least 8 characters
- Must include one uppercase letter
- Must include one number
A Complete Password Validation Example
The example below checks all of these requirements before allowing the form to submit.
import 'package:flutter/material.dart';
void main() {
runApp(const MyApp());
}
class MyApp extends StatelessWidget {
const MyApp({super.key});
@override
Widget build(BuildContext context) {
return MaterialApp(
title: 'TextField Practice',
debugShowCheckedModeBanner: false,
theme: ThemeData(
useMaterial3: true,
colorSchemeSeed: Colors.blue,
brightness: Brightness.light,
),
home: const HomeScreen(),
);
}
}
class HomeScreen extends StatefulWidget {
const HomeScreen({super.key});
@override
State<HomeScreen> createState() => _HomeScreenState();
}
class _HomeScreenState extends State<HomeScreen> {
final _formKey = GlobalKey<FormState>();
void submitForm() {
if (_formKey.currentState!.validate()) {
ScaffoldMessenger.of(
context,
).showSnackBar(const SnackBar(content: Text('Password Accepted')));
}
}
@override
Widget build(BuildContext context) {
final theme = Theme.of(context);
return Scaffold(
appBar: AppBar(
title: const Text('TextField Validation'),
backgroundColor: theme.colorScheme.primary,
foregroundColor: theme.colorScheme.onPrimary,
),
body: Padding(
padding: const EdgeInsets.all(16),
child: Column(
children: [
Form(
key: _formKey,
child: Column(
children: [
TextFormField(
obscureText: true,
decoration: const InputDecoration(labelText: 'Password'),
validator: (value) {
if (value == null || value.trim().isEmpty) {
return 'Password is required';
}
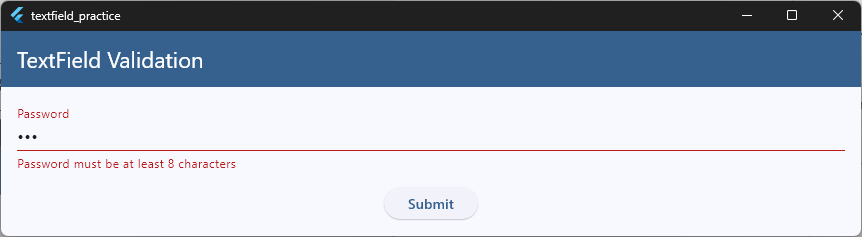
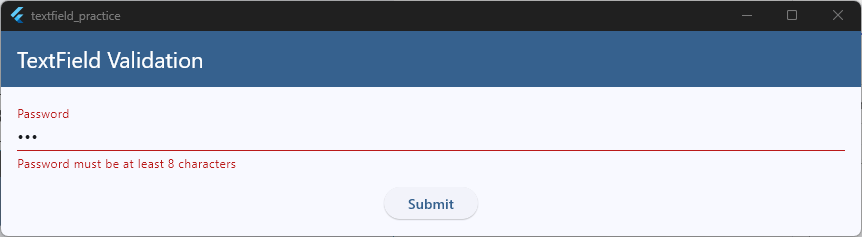
if (value.length < 8) {
return 'Password must be at least 8 characters';
}
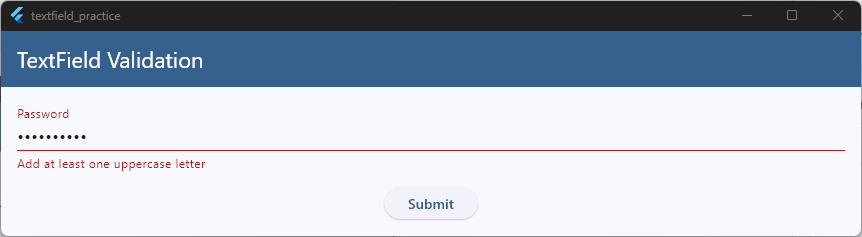
if (!RegExp(r'[A-Z]').hasMatch(value)) {
return 'Add at least one uppercase letter';
}
if (!RegExp(r'[0-9]').hasMatch(value)) {
return 'Add at least one number';
}
return null;
},
),
const SizedBox(height: 16),
ElevatedButton(
onPressed: submitForm,
child: const Text('Submit'),
),
],
),
),
],
),
),
);
}
}
Code language: Dart (dart)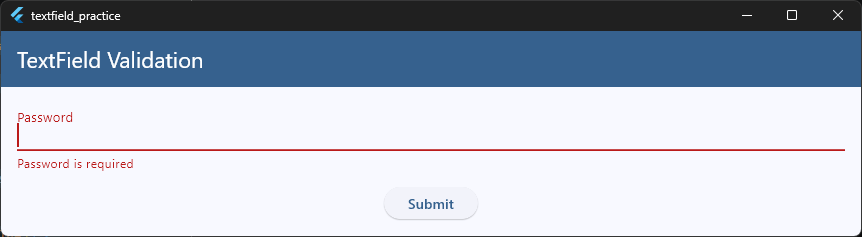

Examples
Valid passwords:
Flutter123
MyPassword1
SecurePass99
Invalid passwords:
password
flutter
abc123
pass
Build Your First Flutter App with My Free Hands-On Class
You’ve already started learning Flutter. Take the next step with a free practical class where you’ll build a real app from scratch. Enter your email below for instant access.
Show One Error at a Time
Notice that the validator returns a single error message.
For example:
if (value.length < 8) {
  return 'Password must be at least 8 characters';
}
Code language: JavaScript (javascript)
This helps users focus on fixing one problem at a time instead of being overwhelmed by multiple error messages.
Keep Password Rules Reasonable
It’s tempting to create very strict password requirements. However, too many rules can frustrate users and increase form abandonment.
For most Flutter apps, a simple combination of:
- Minimum length
- One uppercase letter
- One number
is often enough for a good user experience.
Password validation is even more effective when users receive feedback while typing. In the next section, we’ll look at real-time validation and learn how to show validation errors immediately instead of waiting for the submit button.
Real-Time Validation
So far, our validation examples only run when the user presses a button. While this works, it isn’t always the best user experience.
Imagine entering an email address, filling out an entire form, pressing Submit, and only then discovering that your email is invalid.
A better approach is real-time validation.
With real-time validation, Flutter checks the input as the user types and immediately displays feedback when something is wrong.
Why Use Real-Time Validation?
Real-time validation can:
- Help users fix mistakes faster
- Reduce form submission errors
- Improve the overall user experience
- Make forms feel more responsive
However, it should be used carefully. Showing errors too early can feel annoying, especially when users are still typing.
A Complete Example
In the example below, the email field is validated whenever its value changes.
import 'package:flutter/material.dart';

void main() {
  runApp(const MyApp());
}

class MyApp extends StatelessWidget {
  const MyApp({super.key});

  @override
  Widget build(BuildContext context) {
    return MaterialApp(
      title: 'TextField Practice',
      debugShowCheckedModeBanner: false,
      theme: ThemeData(
        useMaterial3: true,
        colorSchemeSeed: Colors.blue,
        brightness: Brightness.light,
      ),
      home: const HomeScreen(),
    );
  }
}

class HomeScreen extends StatefulWidget {
  const HomeScreen({super.key});

  @override
  State<HomeScreen> createState() => _HomeScreenState();
}

class _HomeScreenState extends State<HomeScreen> {
  String? errorText;

  void validateEmail(String value) {
    if (value.trim().isEmpty) {
      setState(() {
        errorText = 'Email is required';
      });
      return;
    }

    final emailRegex = RegExp(r'^[\w-\.]+@([\w-]+\.)+[\w-]{2,4}$');

    setState(() {
      errorText = emailRegex.hasMatch(value)
          ? null
          : 'Enter a valid email address';
    });
  }

  @override
  Widget build(BuildContext context) {
    final theme = Theme.of(context);

    return Scaffold(
      appBar: AppBar(
        title: const Text('TextField Validation'),
        backgroundColor: theme.colorScheme.primary,
        foregroundColor: theme.colorScheme.onPrimary,
      ),
      body: Padding(
        padding: const EdgeInsets.all(16),
        child: Column(
          children: [
            TextField(
              keyboardType: TextInputType.emailAddress,
              decoration: InputDecoration(
                labelText: 'Email',
                errorText: errorText,
              ),
              onChanged: validateEmail,
            ),
          ],
        ),
      ),
    );
  }
}
Code language: Dart (dart)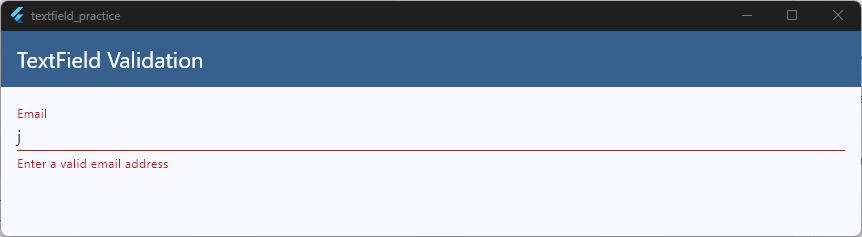
As the user types, the onChanged() callback runs automatically and updates the error message.
Avoid Showing Errors Too Early
One common mistake is showing validation errors the moment a user taps into a field.
For example, if someone types:
jthe app might immediately display:
Enter a valid email addressThis can feel distracting because the user hasn’t finished typing yet.
A better approach is to wait until the user has entered some meaningful input.
For example:
if (value.isEmpty) {
  errorText = null;
}
Code language: JavaScript (javascript)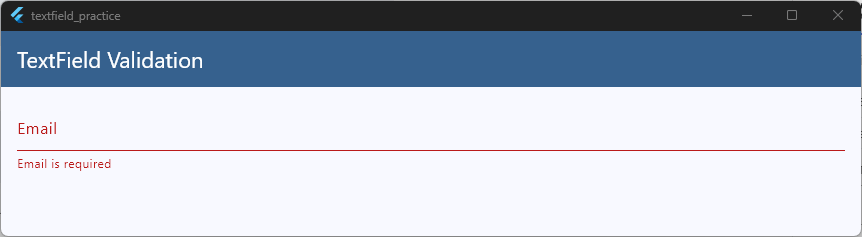
This prevents unnecessary error messages from appearing while the field is still empty.
Real-Time Validation with TextFormField
If you’re using TextFormField, Flutter provides an even easier solution through the autovalidateMode property.
TextFormField(
  autovalidateMode:
      AutovalidateMode.onUserInteraction,
  validator: (value) {
    if (value == null ||
        value.trim().isEmpty) {
      return 'Email is required';
    }

    return null;
  },
)
Code language: Dart (dart)
With AutovalidateMode.onUserInteraction, validation starts automatically after the user interacts with the field. This is often the simplest way to add real-time validation to forms built with TextFormField.
When Should You Use Real-Time Validation?
Real-time validation works especially well for:
- Email fields
- Password fields
- Username fields
- Search inputs
- Registration forms
The goal is to help users succeed, not overwhelm them. Provide feedback at the right time and keep error messages clear and helpful.
Now that users can see validation errors immediately, let’s look at how to write error messages that are actually useful and easy to understand.
Showing Helpful Error Messages
Validation isn’t just about finding mistakes. It’s also about helping users fix them.
A good error message clearly explains:
- What went wrong
- Why it happened
- What the user should do next
The goal is to guide users, not confuse them.
Compare These Messages
Let’s say a user enters an invalid email address.
Not very helpful:
Invalid inputBetter:
Enter a valid email addressThe second message tells the user exactly what needs to be fixed.
Be Specific
Whenever possible, tell users exactly which rule failed.
Good examples:
- Name is required
- Email is required
- Enter a valid email address
- Password must be at least 8 characters
- Add at least one number
Less helpful examples:
- Error
- Invalid field
- Validation failed
- Something went wrong
Specific messages reduce frustration and make forms easier to complete.
A Complete Example
Here’s a simple password field with a helpful validation message.
import 'package:flutter/material.dart';

void main() {
  runApp(const MyApp());
}

class MyApp extends StatelessWidget {
  const MyApp({super.key});

  @override
  Widget build(BuildContext context) {
    return MaterialApp(
      title: 'TextField Practice',
      debugShowCheckedModeBanner: false,
      theme: ThemeData(
        useMaterial3: true,
        colorSchemeSeed: Colors.blue,
        brightness: Brightness.light,
      ),
      home: const HomeScreen(),
    );
  }
}

class HomeScreen extends StatefulWidget {
  const HomeScreen({super.key});

  @override
  State<HomeScreen> createState() => _HomeScreenState();
}

class _HomeScreenState extends State<HomeScreen> {
  final _formKey = GlobalKey<FormState>();

  void submitForm() {
    if (_formKey.currentState!.validate()) {
      ScaffoldMessenger.of(
        context,
      ).showSnackBar(const SnackBar(content: Text('Validation Passed')));
    }
  }

  @override
  Widget build(BuildContext context) {
    final theme = Theme.of(context);

    return Scaffold(
      appBar: AppBar(
        title: const Text('TextField Validation'),
        backgroundColor: theme.colorScheme.primary,
        foregroundColor: theme.colorScheme.onPrimary,
      ),
      body: Padding(
        padding: const EdgeInsets.all(16),
        child: Column(
          children: [
            Form(
              key: _formKey,
              child: Column(
                children: [
                  TextFormField(
                    obscureText: true,
                    decoration: const InputDecoration(labelText: 'Password'),
                    validator: (value) {
                      if (value == null || value.trim().isEmpty) {
                        return 'Password is required';
                      }

                      if (value.length < 8) {
                        return 'Password must be at least 8 characters';
                      }

                      return null;
                    },
                  ),
                  const SizedBox(height: 16),
                  ElevatedButton(
                    onPressed: submitForm,
                    child: const Text('Submit'),
                  ),
                ],
              ),
            ),
          ],
        ),
      ),
    );
  }
}
Code language: Dart (dart)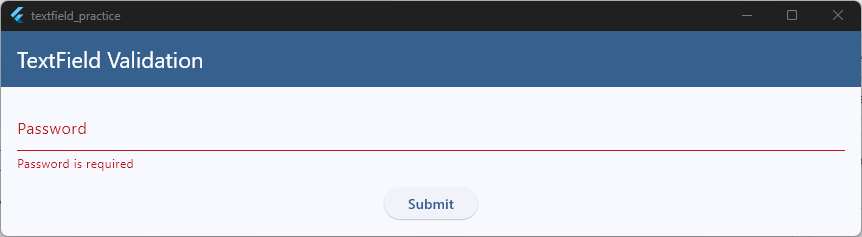
When validation fails, the user immediately understands what needs to be corrected.
Keep Messages Friendly
Error messages should feel helpful, not critical.
Good:
Please enter your email addressGood:
Password must be at least 8 charactersAvoid:
Wrong passwordAvoid:
You entered invalid dataFriendly language creates a better experience and encourages users to complete the form.
Don’t Overload Users
Try to show the most important error first. For example, if a password is empty, show:
Password is requiredinstead of displaying multiple messages at once. This helps users focus on one issue at a time.
Use Error Messages as Guidance
Think of validation messages as instructions rather than warnings. A good error message doesn’t just point out a problem—it helps users solve it.
The easier it is for users to understand what went wrong, the faster they can complete your form successfully.
Now that we’ve covered validation and error messages, let’s look at how to properly clear input fields after a form is submitted or reset.
Clearing Fields Correctly
After a form is submitted, you’ll often want to clear the input fields.
For example:
- A contact form after sending a message
- A registration form after creating an account
- A search field after processing a query
In Flutter, the most common way to clear a TextField or TextFormField is by using a TextEditingController.
A Complete Example
The example below validates a name field and clears it after a successful submission.
import 'package:flutter/material.dart';

void main() {
  runApp(const MyApp());
}

class MyApp extends StatelessWidget {
  const MyApp({super.key});

  @override
  Widget build(BuildContext context) {
    return MaterialApp(
      title: 'TextField Practice',
      debugShowCheckedModeBanner: false,
      theme: ThemeData(
        useMaterial3: true,
        colorSchemeSeed: Colors.blue,
        brightness: Brightness.light,
      ),
      home: const HomeScreen(),
    );
  }
}

class HomeScreen extends StatefulWidget {
  const HomeScreen({super.key});

  @override
  State<HomeScreen> createState() => _HomeScreenState();
}

class _HomeScreenState extends State<HomeScreen> {
  final _formKey = GlobalKey<FormState>();
  final TextEditingController nameController = TextEditingController();

  void submitForm() {
    if (_formKey.currentState!.validate()) {
      ScaffoldMessenger.of(
        context,
      ).showSnackBar(const SnackBar(content: Text('Form Submitted')));

      nameController.clear();
    }
  }

  @override
  void dispose() {
    nameController.dispose();
    super.dispose();
  }

  @override
  Widget build(BuildContext context) {
    final theme = Theme.of(context);

    return Scaffold(
      appBar: AppBar(
        title: const Text('TextField Validation'),
        backgroundColor: theme.colorScheme.primary,
        foregroundColor: theme.colorScheme.onPrimary,
      ),
      body: Padding(
        padding: const EdgeInsets.all(16),
        child: Column(
          children: [
            Form(
              key: _formKey,
              child: Column(
                children: [
                  TextFormField(
                    controller: nameController,
                    decoration: const InputDecoration(labelText: 'Name'),
                    validator: (value) {
                      if (value == null || value.trim().isEmpty) {
                        return 'Name is required';
                      }

                      return null;
                    },
                  ),
                  const SizedBox(height: 16),
                  ElevatedButton(
                    onPressed: submitForm,
                    child: const Text('Submit'),
                  ),
                ],
              ),
            ),
          ],
        ),
      ),
    );
  }
}
Code language: Dart (dart)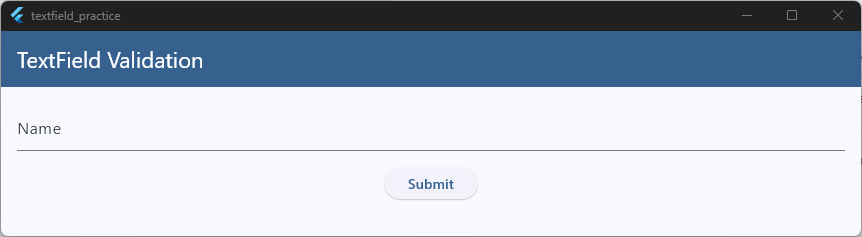
When the form passes validation, the following line removes all text from the field:
nameController.clear();Code language: CSS (css)This is the most common approach when you need to clear a TextFormField in Flutter.
Resetting an Entire Form
If your form contains multiple fields, manually clearing every controller can become repetitive.
Another option is to reset the entire form.
_formKey.currentState!.reset();Code language: CSS (css)This resets all form fields to their initial values.
However, remember that reset() only resets the form state. If you’re using TextEditingControllers, you may still need to clear those controllers separately.
Common Beginner Mistake
A common mistake is clearing fields before validation succeeds.
For example, avoid this:
nameController.clear();

if (_formKey.currentState!.validate()) {
  // Submit form
}
Code language: JavaScript (javascript)
If validation fails, the user’s input is lost and they must type everything again. Instead, validate first and only clear the fields after a successful submission.
Don’t Forget to Dispose Controllers
Whenever you create a TextEditingController, dispose of it when the widget is removed.
@override
void dispose() {
  nameController.dispose();
  super.dispose();
}
Code language: CSS (css)
This helps prevent memory leaks and keeps your app running efficiently.
Whether you’re working with a TextField or a TextFormField, clearing fields correctly helps create a smoother experience for users and keeps your forms feeling polished.
As your forms become larger, managing multiple fields, controllers, and validation rules can become challenging. In the next section, we’ll look at how to manage form state effectively in Flutter.
Managing Form State
Simple forms are easy to manage. However, as your app grows, you’ll often work with forms that contain multiple fields.
For example:
- Name
- Password
- Confirm Password
Managing validation for several fields can quickly become difficult if your code isn’t organized properly. This is where form state becomes important.
What Is Form State?
Form state is simply the current condition of your form.
It includes things such as:
- Field values
- Validation status
- Error messages
- Whether the form can be submitted
Flutter’s Form widget helps manage this state through a GlobalKey<FormState>.
A Complete Example
The example below contains two fields and validates them together using a single form state.
import 'package:flutter/material.dart';

void main() {
  runApp(const MyApp());
}

class MyApp extends StatelessWidget {
  const MyApp({super.key});

  @override
  Widget build(BuildContext context) {
    return MaterialApp(
      title: 'TextField Practice',
      debugShowCheckedModeBanner: false,
      theme: ThemeData(
        useMaterial3: true,
        colorSchemeSeed: Colors.blue,
        brightness: Brightness.light,
      ),
      home: const HomeScreen(),
    );
  }
}

class HomeScreen extends StatefulWidget {
  const HomeScreen({super.key});

  @override
  State<HomeScreen> createState() => _HomeScreenState();
}

class _HomeScreenState extends State<HomeScreen> {
  final _formKey = GlobalKey<FormState>();

  final emailController = TextEditingController();
  final passwordController = TextEditingController();

  void submitForm() {
    if (_formKey.currentState!.validate()) {
      ScaffoldMessenger.of(
        context,
      ).showSnackBar(const SnackBar(content: Text('Form Submitted')));
    }
  }

  @override
  void dispose() {
    emailController.dispose();
    passwordController.dispose();
    super.dispose();
  }

  @override
  Widget build(BuildContext context) {
    final theme = Theme.of(context);

    return Scaffold(
      appBar: AppBar(
        title: const Text('TextField Validation'),
        backgroundColor: theme.colorScheme.primary,
        foregroundColor: theme.colorScheme.onPrimary,
      ),
      body: Padding(
        padding: const EdgeInsets.all(16),
        child: Column(
          children: [
            Form(
              key: _formKey,
              child: Column(
                children: [
                  TextFormField(
                    controller: emailController,
                    decoration: const InputDecoration(labelText: 'Email'),
                    validator: (value) {
                      if (value == null || value.trim().isEmpty) {
                        return 'Email is required';
                      }

                      return null;
                    },
                  ),
                  const SizedBox(height: 16),
                  TextFormField(
                    controller: passwordController,
                    obscureText: true,
                    decoration: const InputDecoration(labelText: 'Password'),
                    validator: (value) {
                      if (value == null || value.trim().isEmpty) {
                        return 'Password is required';
                      }

                      return null;
                    },
                  ),
                  const SizedBox(height: 16),
                  ElevatedButton(
                    onPressed: submitForm,
                    child: const Text('Login'),
                  ),
                ],
              ),
            ),
          ],
        ),
      ),
    );
  }
}
Code language: Dart (dart)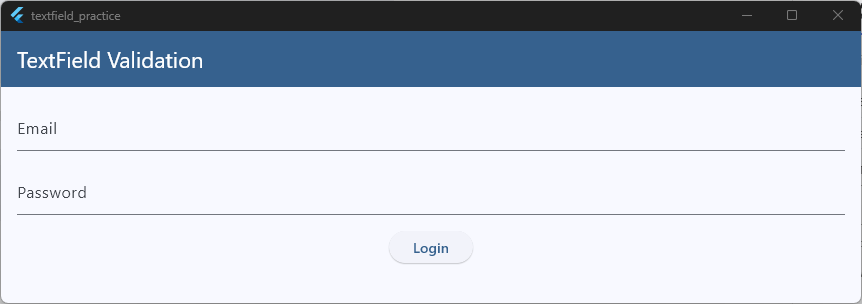
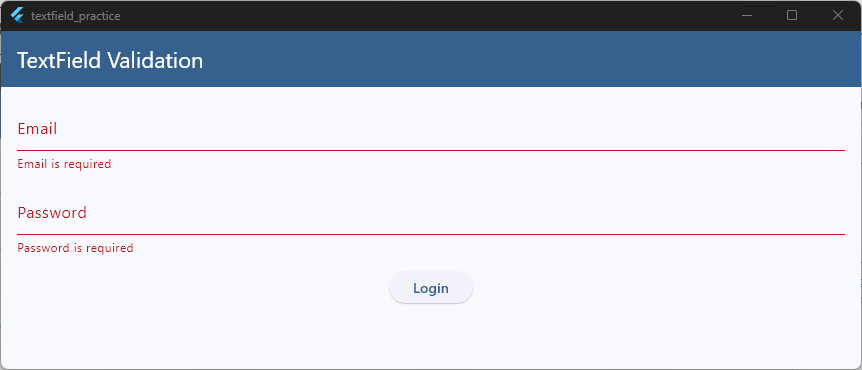
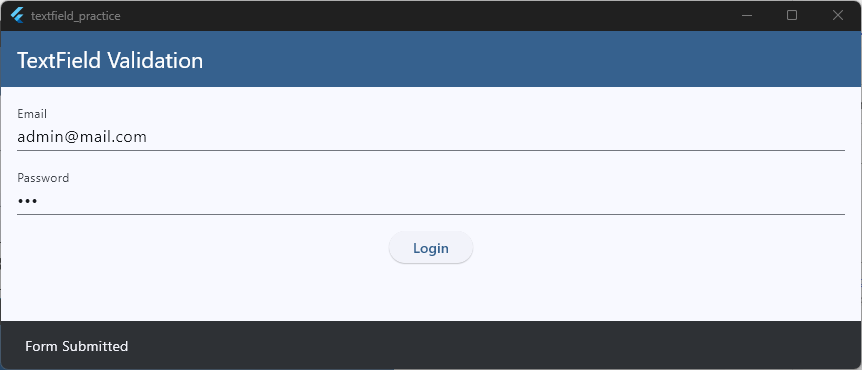
When the user taps the button, Flutter validates every field inside the form.
_formKey.currentState!.validate();Code language: CSS (css)This is much easier than validating each field manually.
Why Use Controllers?
Controllers allow you to access and update field values whenever needed.
For example:
print(emailController.text);Code language: CSS (css)You can use controllers to:
- Read user input
- Clear fields
- Set default values
- Update text programmatically
This is especially useful when working with larger forms.
Keep Related Logic Together
As forms become more complex, try to keep related code in one place.
For example:
- Controllers near the top of the class
- Validation inside the relevant field
- Submit logic in a separate method
This makes your code easier to read and maintain.
When Forms Become Larger
For small forms, using Form, FormState, and TextEditingController is usually enough.
As your application grows, you may want to move form data and validation logic into a dedicated state management solution.
This can help keep your UI clean and make complex forms easier to maintain.
If you’d like to learn how providers, blocs, and other state management approaches can help organize larger Flutter applications, check out our Flutter State Management Guide.
Managing form state properly makes validation easier, reduces duplicate code, and helps keep your forms predictable as they grow. In the next section, we’ll look at some common validation mistakes and how to avoid them.
Preventing Common Validation Bugs
Even when your validation code looks correct, small mistakes can cause forms to behave unexpectedly. The good news is that most validation bugs are easy to avoid once you know what to look for.
Let’s look at some of the most common issues beginners encounter when building Flutter forms.
Forgetting to Call validate()
One of the most common mistakes is creating validators but never running them. For example, this button won’t trigger validation:
ElevatedButton(
  onPressed: () {
    print('Submit');
  },
  child: const Text('Submit'),
)
Code language: PHP (php)
Instead, make sure you call:
if (_formKey.currentState!.validate()) {
  // Submit form
}
Code language: JavaScript (javascript)
Without validate(), Flutter never runs the validators attached to your fields.
Forgetting to Return null
Every validator must return:
- An error message when validation fails
nullwhen validation succeeds
Incorrect:
validator: (value) {
  if (value!.isEmpty) {
    return 'Name is required';
  }
}
Code language: JavaScript (javascript)
Correct:
validator: (value) {
  if (value!.isEmpty) {
    return 'Name is required';
  }

  return null;
}
Code language: JavaScript (javascript)
Returning null tells Flutter that validation passed successfully.
Not Using trim()
Users sometimes enter spaces instead of actual text.
For example:
' 'Code language: JavaScript (javascript)Without trim(), Flutter sees this as text and may allow the form to pass validation.
Instead of:
value.isEmptyCode language: CSS (css)use:
value.trim().isEmptyCode language: CSS (css)This removes unnecessary spaces before validation runs.
Clearing Fields Too Early
Another common mistake is clearing fields before validation succeeds.
Incorrect:
nameController.clear();

if (_formKey.currentState!.validate()) {
  // Submit form
}
Code language: JavaScript (javascript)
If validation fails, the user’s input is lost.
A better approach is:
if (_formKey.currentState!.validate()) {
  nameController.clear();
}
This preserves the user’s data until validation succeeds.
Forgetting to Dispose Controllers
If you use a TextEditingController, remember to dispose of it.
@override
void dispose() {
  emailController.dispose();
  super.dispose();
}
Code language: CSS (css)
This helps prevent memory leaks and keeps your application running efficiently.
Using Confusing Error Messages
Validation can technically work while still creating a poor user experience.
For example:
Invalid input
doesn’t tell users what they need to fix.
A better message would be:
Enter a valid email addressClear messages help users complete forms faster and with less frustration.
Forgetting Real-World Testing
A form may appear to work perfectly until real users start interacting with it.
Before releasing your app, test cases such as:
- Empty fields
- Spaces only
- Invalid email formats
- Very short passwords
- Extremely long input values
- Rapid typing and deleting
Testing these scenarios helps uncover problems before your users find them.
Final Thoughts
Form validation is a small feature that has a big impact on user experience.
By validating input correctly, showing helpful error messages, managing form state properly, and avoiding common mistakes, you can build forms that feel reliable and professional.
Whether you’re creating a login screen, registration form, contact page, or profile editor, the principles in this guide will help you build Flutter forms that work well in real-world applications.
If you’re still building your Flutter fundamentals, our Flutter Foundations Course for Beginners is a great next step for learning the core concepts that every Flutter developer should know.
Ready to Build Real Flutter Apps?
Nice work making it to the end! If this guide helped you, you’ll love my free hands-on Flutter class where we build a real app together, step by step.