Learn How to Add Custom Fonts in Flutter, Configure pubspec.yaml, Apply Font Weights, Change Font Families, and Build Beautiful Typography Across Your App
Typography can make or break your mobile app. Have you ever opened an app and felt instantly connected to it, even before you read a single word? That is the power of a great typeface.
It gives your app a unique personality. It guides your users’ eyes, improves readability, and makes your entire user interface feel polished and professional.
By default, Flutter apps use the standard system fonts. On Android, that means Roboto. On iOS, it means San Francisco. There is absolutely nothing wrong with these fonts. They are clean, readable, and highly optimized.
But if you are building a unique digital product, using the same default typography as everyone else can make your app look generic. To build a truly custom brand experience, you need to know how to add and manage your own typefaces.
In this deep-dive guide, we are going to learn how to add, change, and manage fonts in Flutter the right way.
We will cover everything from handling local font files to utilizing the Google Fonts package, configuring your configuration files, and even working with modern variable fonts. Best of all, we will do this using a practical, hands-on approach.
We will build out real code examples together, step-by-step.
Before we write our first line of code, let’s look at the absolute foundation of our practice environment. We will use a clean, structured boilerplate code snippet for all our examples.
Open up your favorite code editor—I highly recommend using VS Code—and make sure your development environment is fully set up. Here is the exact starting code we will use to test our custom typography:
import 'package:flutter/material.dart';

void main() {
  runApp(const MyApp());
}

class MyApp extends StatelessWidget {
  const MyApp({super.key});

  @override
  Widget build(BuildContext context) {
    return MaterialApp(
      title: 'Typography Practice',
      debugShowCheckedModeBanner: false,
      theme: ThemeData(
        useMaterial3: true,
        colorSchemeSeed: Colors.blue,
        brightness: Brightness.light,
      ),
      home: const HomeScreen(),
    );
  }
}

class HomeScreen extends StatefulWidget {
  const HomeScreen({super.key});

  @override
  State<HomeScreen> createState() => _HomeScreenState();
}

class _HomeScreenState extends State<HomeScreen> {
  @override
  Widget build(BuildContext context) {
    return const Scaffold(
      body: Center(
        child: Text('Hello Flutter!', style: TextStyle(fontSize: 24)),
      ),
    );
  }
}
Code language: Dart (dart)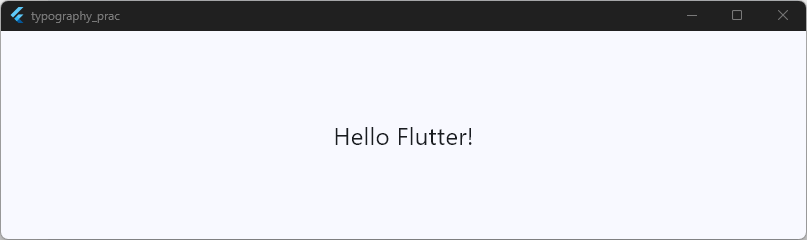
Make sure you have this baseline code running smoothly on your emulator or physical device before moving forward. Ready?
Let’s dive deep into how Flutter handles fonts under the hood!
- How Flutter fonts work
- Adding custom fonts
- pubspec.yaml configuration
- Using fontFamily
- Loading OTF and TTF fonts
- Local vs package fonts
- Using Google Fonts package
- Pre-bundling for Offline Production
- Global font family
- Multiple font weights
- Variable fonts
- Font licensing considerations
- How to Document Licenses in Your App
- Troubleshooting fonts that don't work
- Wrapping Up & Next Steps
- Build Your First Flutter App with My Free Hands-On Class
- Build Your First Flutter App with My Free Hands-On Class
How Flutter fonts work
To understand how to change your app’s typography, we first need to look at what happens under the hood. When Flutter renders text on the screen, it does not rely on the native Android or iOS platform text view widgets.
Instead, Flutter acts like a high-performance game engine. It draws every single pixel directly onto a Skia or Impeller graphics canvas.
Because Flutter draws its own user interface, it needs direct access to the actual font files to know exactly how to draw each character shape.
When you do not specify a font, Flutter defaults to the host operating system’s primary typeface. This keeps your app looking clean and native out of the box.
But when you want a custom flutter font family, Flutter needs to load those font files into the application memory.
The Font Lifecycle
Every time a Text widget is drawn, Flutter follows a specific look-up process to render your typography:
- Style Lookup: The framework reads the
TextStyleproperty of your widget. It looks for a specificfontFamily,fontWeight, orfontStyle. - Engine Search: The Flutter engine searches its internal asset registry to see if a font file matches that exact family name and weight configuration.
- Fallback Strategy: If the engine finds a match, it reads the font file’s vector data to draw the text. If the engine cannot find a match—or if you misspelled the family name in your configuration—it silently drops back to the system’s
flutter default font.
Knowing this fallback behavior is incredibly useful. If your text suddenly changes to a generic sans-serif font during development, it almost always means the engine couldn’t locate your asset path or name.
Now that we know how the engine treats a flutter font file, let’s look at how to actually prepare our project files to bring our own custom designs to life!
Adding custom fonts
Ready to add your own flair? Bringing a unique typeface into your application involves a simple, three-step workflow.
We have to source the asset files, place them in an organized project structure, and then register them so the engine can look them up.
Here is exactly how you handle the asset preparation phase.
Step 1: Source Your Font Files
First, you need to grab the physical font files you want to use. You can download these from popular marketplaces or platforms like Google Fonts.
When choosing files, Flutter handles two primary desktop font standards perfectly:
.ttf(TrueType Font): Excellent support across all systems..otf(OpenType Font): Fully supported, great for advanced typographic features.
A Quick Warning on Web Formats: If you are building for multiple platforms, avoid using
.woffor.woff2files. While they work wonderfully on the web, Flutter does not natively support them out of the box for standard iOS and Android application builds. Stick to.ttfor.otfto stay safe.
Step 2: Set Up Your Project Directory
Once you have downloaded your flutter font assets, you need a place to store them. Navigate to the root folder of your project. Create a dedicated directory structure to keep things organized.
While you can technically name this folder anything, it is best practice to keep it predictable. Create an assets folder, and inside it, create a fonts subdirectory. Drop your downloaded files directly into that location.
Your project tree should look exactly like this:
my_flutter_app/
├── android/
├── ios/
├── lib/
│   └── main.dart
├── assets/
│   └── fonts/
│       ├── CustomFont-Regular.ttf
│       └── CustomFont-Bold.ttf
└── pubspec.yaml
Now that your physical files are sitting neatly inside your workspace directory, the engine still doesn’t know they exist. In the next section, we will crack open the configuration file to officially declare our new assets!
pubspec.yaml configuration
Now that your physical files are sitting neatly inside your assets/fonts/ folder, it is time to tell your application about them. We do this inside the pubspec.yaml file.
This configuration file acts as the control panel for your entire project, and editing it requires a little bit of precision.
Let’s look at exactly how to map out your assets so you can flutter add font family configurations without any syntax errors.
The pubspec.yaml Structure
Open your pubspec.yaml file and scroll down until you see the flutter: block. You will need to add a fonts: section directly underneath it.
Here is a complete, working example of how to register a font family with regular, italic, and bold variations:
flutter:
  uses-material-design: true

  # Register your flutter custom fonts here
  fonts:
    - family: Lobster
      fonts:
        - asset: assets/fonts/LobsterTwo-Bold.ttf
          weight: 700
        - asset: assets/fonts/LobsterTwo-Italic.ttf
          style: italic
        - asset: assets/fonts/LobsterTwo-Regular.ttf
          style: normal
Code language: YAML (yaml)
Indentation: The #1 Pitfall
YAML files are incredibly picky about spacing. If your indentation is off by even a single space, your build will fail, or Flutter will completely ignore your settings. Follow these spacing rules strictly:
fonts:must be indented by exactly two spaces under theflutter:tag.- The dash (
- family:) must be indented by exactly four spaces. - The inner
fonts:list must be indented by exactly six spaces. - The asset entries (
- asset:) must be indented by exactly eight spaces.
💡 Tip for VS Code Users: If you are using VS Code, look at the light vertical guide lines in your code editor. They make it much easier to ensure your spaces align perfectly.
Understanding the Configuration Properties
When writing your flutter fonts pubspec settings, you are defining how the engine maps your code to the actual asset files:
family: This is the string nickname you give your typeface. You can name it whatever you like, but it is best to keep it simple. This is the exact name you will use later in your Dart code.asset: The precise file path relative to your project root. Double-check that this matches your folder names exactly!weight: Defines the numerical weight of the font file. A regular weight is400(the default), while bold is typically700.style: Explicitly marks variations likeitalic.
Once you finish editing, save the file. Your code editor will automatically run flutter pub get in the background to load your new settings into the application memory.
Let’s jump into the code and see how to use our freshly configured font!
Using fontFamily
Now that your project configuration is set up, let’s look at how to actually show off your new typeface on the screen.
To do this, we use the fontFamily property inside the TextStyle class. This tells the Text widget exactly which registered design system to look up.
Let’s modify our boilerplate code to create a working example using our CustomFont.
Applying fontFamily to a Text Widget
When you want to flutter use font family styles on a single element, you pass the exact string nickname you declared in your configuration file to the TextStyle object.
Here is a full, runnable example you can paste right into your development environment:
class _HomeScreenState extends State<HomeScreen> {
  @override
  Widget build(BuildContext context) {
    return const Scaffold(
      body: Center(
        child: Text(
          'Making Things Beautiful',
          style: TextStyle(
            fontFamily: 'Lobster', // Exact name from pubspec.yaml
            fontSize: 28,
            fontWeight: FontWeight.bold,
          ),
        ),
      ),
    );
  }
}
Code language: Dart (dart)
Mind the Strings: Avoid Typos
The most common reason a custom style doesn’t display correctly is a simple typo. The string value you supply to fontFamily must be a flawless match with the name written next to - family: inside your configuration files.
- If you wrote
- family: BrandSansin your configuration,fontFamily: 'BrandSans'will work perfectly. - Writing
fontFamily: 'brandSans'orfontFamily: 'Brand Sans'will fail silently, causing Flutter to fall back to the generic system appearance.
Clean Code Tip: To prevent annoying typos across a massive project, it is highly recommended to store your string constants in a centralized file. You can create a simple class like
class AppFonts { static const String main = 'CustomFont'; }and referenceAppFonts.maineverywhere instead of typing raw strings.
Now that we know how to wire up a basic style, let’s explore how Flutter loads specific desktop extensions like OTF and TTF behind the scenes!
Loading OTF and TTF fonts
When it comes to rendering desktop typefaces, Flutter is incredibly flexible. As we touched on earlier, both TrueType Fonts (.ttf) and OpenType Fonts (.otf) are fully supported across iOS, Android, desktop, and web platforms.
However, under the hood, there is a technical difference in how these files hold their vector shapes. Let’s look at how the framework handles them and how to implement them side-by-side.
TTF vs. OTF: What is Happening Inside?
flutter ttf fontfiles: TrueType is an older, battle-tested format. It uses quadratic Bézier curves to define the outlines of letters. Because the math is simple, rendering is incredibly fast and highly efficient for mobile screens.flutter otf fontfiles: OpenType is a newer standard built on top of TTF. It uses cubic Bézier curves, which allow designers to pack advanced typographic features—like complex ligatures, alternate glyphs, and beautiful stylistic sets—into a much smaller file footprint.
The great news? The Flutter engine handles the mathematical differences seamlessly. You use the exact same loading procedure regardless of which format you choose.
Implementation Blueprint
Let’s look at how to load a .ttf header font alongside an .otf body font in the same application. First, make sure both files are registered in your configuration:
Loading OTF and TTF fonts
When it comes to rendering desktop typefaces, Flutter is incredibly flexible. As we touched on earlier, both TrueType Fonts (.ttf) and OpenType Fonts (.otf) are fully supported across iOS, Android, desktop, and web platforms.
However, under the hood, there is a technical difference in how these files hold their vector shapes. Let’s look at how the framework handles them and how to implement them side-by-side.
TTF vs. OTF: What is Happening Inside?
flutter ttf fontfiles: TrueType is an older, battle-tested format. It uses quadratic Bézier curves to define the outlines of letters. Because the math is simple, rendering is incredibly fast and highly efficient for mobile screens.flutter otf fontfiles: OpenType is a newer standard built on top of TTF. It uses cubic Bézier curves, which allow designers to pack advanced typographic features—like complex ligatures, alternate glyphs, and beautiful stylistic sets—into a much smaller file footprint.
The great news? The Flutter engine handles the mathematical differences seamlessly. You use the exact same loading procedure regardless of which format you choose.
Implementation Blueprint
Let’s look at how to load a .ttf header font alongside an .otf body font in the same application. First, make sure both files are registered in your configuration:
flutter:
  fonts:
    - family: HeadingFont
      fonts:
        - asset: assets/fonts/LobsterTwo-Regular.ttf
    - family: BodyFont
      fonts:
        - asset: assets/fonts/BauhausstdLight.otf
Code language: YAML (yaml)
Now, let’s look at a complete, runnable example using our baseline structure to display both formats running perfectly together:
class _HomeScreenState extends State<HomeScreen> {
  @override
  Widget build(BuildContext context) {
    return const Scaffold(
      body: SafeArea(
        child: Padding(
          padding: const EdgeInsets.all(24.0),
          child: Column(
            crossAxisAlignment: CrossAxisAlignment.start,
            mainAxisAlignment: MainAxisAlignment.center,
            children: [
              Text(
                'TrueType Heading (.ttf)',
                style: TextStyle(
                  fontFamily: 'HeadingFont',
                  fontSize: 32,
                  fontWeight: FontWeight.bold,
                ),
              ),
              SizedBox(height: 16),
              Text(
                'This paragraph is rendered using an OpenType font file format. The engine processes the advanced vector glyph curves effortlessly, ensuring clean lines on high-density mobile screens.',
                style: TextStyle(
                  fontFamily: 'BodyFont',
                  fontSize: 16,
                  height: 1.5,
                ),
              ),
            ],
          ),
        ),
      ),
    );
  }
}
Code language: Dart (dart)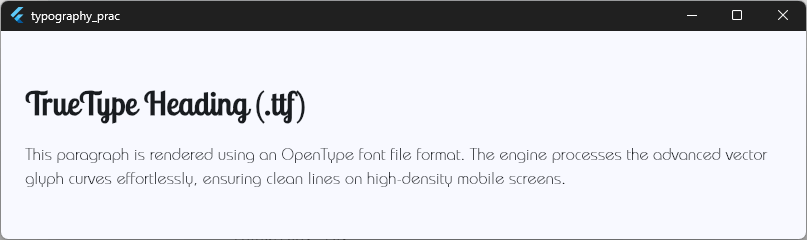
Now that you know how to leverage different file extensions, let’s explore where these files live strategically. Next, we will break down the structural differences between hosting assets locally versus importing them from external feature packages!
Local vs package fonts
When managing your flutter local fonts, you store the files directly inside your application project tree. This gives you absolute control over your asset pipeline. However, there is another incredibly powerful way to handle typography: importing typefaces directly through a shared asset package.
Let’s break down how local styling compares to package distribution, and see how we can use the popular google_fonts package to speed up our development workflow.
Local Fonts vs. Package Fonts
- Local Fonts (
assets/fonts/): You bundle the files inside your repository. They load instantly offline because they are compiled directly into your final application binary. The downside is that they manually increase your initial app download size. - Package Fonts: The assets live inside an external Dart package. You simply declare the package dependency, and the framework resolves the styling assets for you. This is fantastic for modular apps or open-source packages that need a unified design language.
Enter the Google Fonts Package
The google_fonts package is a hybrid marvel. It gives you instant access to over 1,000 open-source typefaces from the Google Fonts library without needing to download a single file manually or touch your configuration files!
By default, the google_fonts package downloads the required text assets dynamically over the internet the very first time the user opens your app. It then caches them securely in the device’s local storage so they work perfectly offline from that point forward.
Let’s see how to add and use this flutter font package using our codebase.
Step 1: Add the Dependency
Open your terminal at the root of your project and run the following command to add the package:
flutter pub add google_fonts
Step 2: The Working Implementation
Once the package is added, you can import it into your Dart code and use its clean utility methods to instantly apply gorgeous styling.
Here is a full, working example demonstrating how to mix a local font asset style right next to an on-the-fly Google Fonts package style:
// Import the package
import 'package:google_fonts/google_fonts.dart';

class _HomeScreenState extends State<HomeScreen> {
  @override
  Widget build(BuildContext context) {
    return Scaffold(
      body: Center(
        child: Column(
          mainAxisAlignment: MainAxisAlignment.center,
          children: [
            // Example 1: Using your local asset registry
            Text(
              'Local Asset Style',
              style: TextStyle(
                fontFamily: 'HeadingFont',
                // Loaded from your assets folder
                fontSize: 24,
              ),
            ),
            SizedBox(height: 8),

            // Example 2: Using the Google Fonts package dynamically
            Text(
              'Google Fonts Package Style',
              style: GoogleFonts.poppins(
                fontSize: 24,
                fontWeight: FontWeight.w600,
                color: Colors.deepPurple,
              ),
            ),
          ],
        ),
      ),
    );
  }
}
Code language: Dart (dart)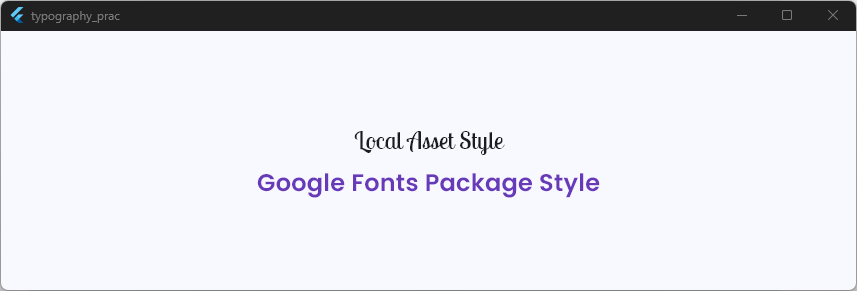
Now that you know how to fetch package assets on demand, let’s explore how to go a step further.
Next, we will look at how to stop declaring your typefaces on individual text elements and instead configure a clean flutter global font family across your entire application theme!
Using Google Fonts package
Now that you have a taste of what the google_fonts package can do, let’s look closely at how it functions.
It is one of the most popular tools in the entire ecosystem because it completely changes how you think about design pipelines. You do not have to mess around with manual file downloads or complex asset mappings to test a new look.
Let’s look at how to get the most out of this package, step-by-step.
The Dynamic Loading Process
When you use a style like GoogleFonts.lato(), Flutter checks your device’s local system storage first. If the user has opened the app before, the engine loads the cached font instantly.
If it is a fresh install, the library fetches the correct .ttf asset file from the official Google Fonts servers in the background.
The app will display a clean fallback system typography for a split second until the file downloads completely. Once it arrives, the text updates smoothly.
Mixing Static and Dynamic Styles
You can combine standard TextStyle properties with your Google Fonts configuration seamlessly. This is great if you want to override font metrics, line spacings, or letter colors.
Let’s look at a complete, working example using our standard boilerplate code layout:
class _HomeScreenState extends State<HomeScreen> {
  @override
  Widget build(BuildContext context) {
    return Scaffold(
      body: Center(
        child: Padding(
          padding: const EdgeInsets.all(24.0),
          child: Column(
            mainAxisAlignment: MainAxisAlignment.center,
            children: [
              // Example 1: Standard package configuration
              Text(
                'Elegant Montserrat',
                style: GoogleFonts.montserrat(
                  fontSize: 28,
                  fontWeight: FontWeight.bold,
                ),
              ),
              const SizedBox(height: 16),

              // Example 2: Mixing with advanced properties using textStyle
              Text(
                'Customized Roboto Mono details with tracking adjustments.',
                style: GoogleFonts.robotoMono(
                  fontSize: 16,
                  color: Colors.blueGrey[800],
                  letterSpacing: 0.5,
                  height: 1.4,
                ),
              ),
            ],
          ),
        ),
      ),
    );
  }
}
Code language: Dart (dart)
Build Your First Flutter App with My Free Hands-On Class
You’ve already started learning Flutter. Take the next step with a free practical class where you’ll build a real app from scratch. Enter your email below for instant access.
Pre-bundling for Offline Production
What if your users don’t have an active internet connection? Relying on live network calls can cause your typography to glitch or fall back to native device layouts.
The package solves this beautifully. You can download your favorite Google Font files manually and bundle them straight into an asset folder (like assets/google_fonts/).
Simply include that folder path under the assets: declaration inside your pubspec.yaml:
flutter:
  assets:
    - assets/google_fonts/
Code language: YAML (yaml)
The Big Bonus: You do not need to list individual weights in the
fonts:section. The package matches the filenames automatically. It reads them straight from your assets locally without hitting the internet!
Now that we know how to use single widgets with custom packages, let’s look at how to scale our architecture. Next, we will check out how to apply a single typeface globally across our entire app!
Global font family
Explicitly passing a fontFamily string to every single Text widget in your application quickly becomes an absolute maintenance nightmare.
If your team decides to change the corporate branding next month, you would have to find and rewrite thousands of text styles manually.
Thankfully, Flutter allows you to set up a unified design system. By assigning a flutter global font family, you tell the framework to use your chosen custom styling as the absolute default fallback for every single text element across your application layout.
Let’s look at how to set this up using both local assets and the Google Fonts package.
Setting a Global Asset Font
To establish an application-wide default using a font registered in your configuration file, you pass your typeface’s nickname to the fontFamily property inside your master ThemeData configuration.
Here is a full, working example showing how to lock down a global font family across your entire application tree:
class MyApp extends StatelessWidget {
  const MyApp({super.key});

  @override
  Widget build(BuildContext context) {
    return MaterialApp(
      title: 'Typography Practice',
      debugShowCheckedModeBanner: false,
      theme: ThemeData(
        useMaterial3: true,
        colorSchemeSeed: Colors.blue,
        brightness: Brightness.light,
        // This sets the flutter default font family for every Text widget
        fontFamily: 'CustomFont',
      ),
      home: const HomeScreen(),
    );
  }
}
Code language: Dart (dart)
class _HomeScreenState extends State<HomeScreen> {
@override
Widget build(BuildContext context) {
return Scaffold(
body: Center(
child: Column(
mainAxisAlignment: MainAxisAlignment.center,
children: [
Text(
'This heading uses the global asset font.',
style: TextStyle(fontSize: 24, fontWeight: FontWeight.bold),
),
SizedBox(height: 12),
Text(
'This body paragraph also inherits the global asset font without declaring it manually.',
style: TextStyle(fontSize: 16),
),
],
),
),
);
}
}
Code language: Dart (dart)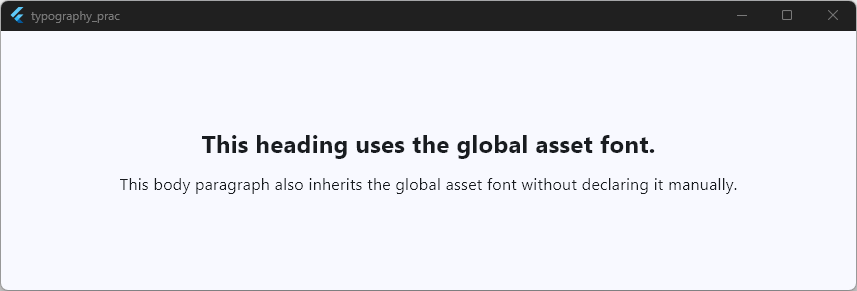
Setting a Global Package Font
If you prefer to use the Google Fonts package globally without touching your local file directories, the workflow is just as elegant.
Instead of using a raw string parameter, you can inject a complete TextTheme object directly into your project’s ThemeData structure using the GoogleFonts.textTheme() injector.
Modify your MaterialApp theme definition like this:
import 'package:flutter/material.dart';
import 'package:google_fonts/google_fonts.dart';

class MyApp extends StatelessWidget {
  const MyApp({super.key});

  @override
  Widget build(BuildContext context) {
    return MaterialApp(
      title: 'Typography Practice',
      debugShowCheckedModeBanner: false,
      theme: ThemeData(
        useMaterial3: true,
        colorSchemeSeed: Colors.blue,
        brightness: Brightness.light,
        // Binds the dynamic font package to the entire app theme topology
        textTheme: GoogleFonts.interTextTheme(ThemeData.light().textTheme),
      ),
      home: const HomeScreen(),
    );
  }
}
Code language: Dart (dart)
class _HomeScreenState extends State<HomeScreen> {
@override
Widget build(BuildContext context) {
return Scaffold(
body: Center(
child: Column(
mainAxisAlignment: MainAxisAlignment.center,
children: [
Text(
'This heading uses the global asset font.',
style: TextStyle(fontSize: 24, fontWeight: FontWeight.bold),
),
SizedBox(height: 12),
Text(
'This body paragraph also inherits the global asset font without declaring it manually.',
style: TextStyle(fontSize: 16),
),
],
),
),
);
}
}
Code language: Dart (dart)
Overriding the Default: Setting a global configuration does not lock you down completely. If you have a specific banner or unique layout element that needs a distinct look, you can still pass a different
fontFamilydirectly to that specificTextStyle. The local element property will always override your global theme settings.
Now that our global architecture is incredibly clean, let’s explore how to safely manage multiple text thicknesses and styles across the exact same font system!
Multiple font weights
When building a beautiful user interface, contrast is your best friend. It helps users separate headings from body text instantly. To create this contrast, you need to use different font thicknesses, which we call font weights.
A common rookie mistake is registering every single thickness as a completely separate font family name. If you do that, your code will quickly become messy.
Instead, you should group all variations under a single, unified font name inside your project settings. Let’s look at how to map and use multiple weights the right way.
The Correct pubspec.yaml Structure
To bundle different thicknesses under the same family name, list multiple asset paths under a single family entry. Use the weight property to tell Flutter which file belongs to which numerical thickness.
Here is how you map four different weights for a font family called Playfair:
flutter:
  fonts:
    - family: PlayFair
      fonts:
        - asset: assets/fonts/Playfair_9pt-Light.ttf
          weight: 300
        - asset: assets/fonts/Playfair_9pt-Regular.ttf
          weight: 400 # This is the standard default weight
        - asset: assets/fonts/Playfair_9pt-Medium.ttf
          weight: 500
        - asset: assets/fonts/Playfair_9pt-Bold.ttf
          weight: 700
Code language: YAML (yaml)
Understanding Numerical Weights
Flutter maps its FontWeight classes to standard digital typography numbers. Here is a quick reference table to help you match your font files to the correct code properties:
| Font Variation Name | Numerical Value | Flutter Code Property |
| Thin / Light | 100 to 300 | FontWeight.w300 |
| Regular / Normal | 400 | FontWeight.normal or FontWeight.w400 |
| Medium / SemiBold | 500 to 600 | FontWeight.w500 or FontWeight.w600 |
| Bold | 700 | FontWeight.bold or FontWeight.w700 |
| Black / Ultra | 900 | FontWeight.w900 |
The Working Code Example
Now, let’s implement these weights in a clean, running interface. We will use our standard practice boilerplate to display the different thicknesses side-by-side using the exact same fontFamily name.
class _HomeScreenState extends State<HomeScreen> {
  @override
  Widget build(BuildContext context) {
    return Scaffold(
      body: SafeArea(
        child: Padding(
          padding: EdgeInsets.all(24.0),
          child: Column(
            crossAxisAlignment: CrossAxisAlignment.start,
            mainAxisAlignment: MainAxisAlignment.center,
            children: [
              Text(
                'Light Weight (300)',
                style: TextStyle(
                  fontFamily: 'PlayFair',
                  fontSize: 24,
                  fontWeight: FontWeight.w300,
                ),
              ),
              SizedBox(height: 16),
              Text(
                'Regular Weight (400)',
                style: TextStyle(
                  fontFamily: 'PlayFair',
                  fontSize: 24,
                  fontWeight: FontWeight.normal,
                ),
              ),
              SizedBox(height: 16),
              Text(
                'Medium Weight (500)',
                style: TextStyle(
                  fontFamily: 'PlayFair',
                  fontSize: 24,
                  fontWeight: FontWeight.w500,
                ),
              ),
              SizedBox(height: 16),
              Text(
                'Bold Weight (700)',
                style: TextStyle(
                  fontFamily: 'PlayFair',
                  fontSize: 24,
                  fontWeight: FontWeight.bold,
                ),
              ),
            ],
          ),
        ),
      ),
    );
  }
}
Code language: Dart (dart)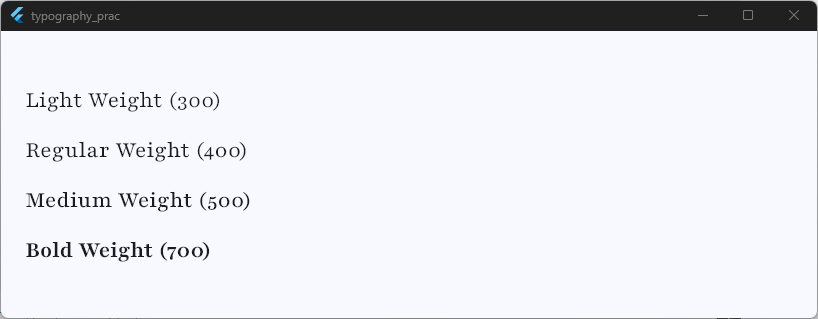
⚠️ What Happens if a Weight is Missing? If you apply
FontWeight.w900in your code but did not register a 900-weight file in your configuration, Flutter will not crash. Instead, the layout engine automatically picks the closest available thickness registered under that family name.
Now that we know how to manage multiple static files for different weights, let’s explore a modern alternative that squishes all these thicknesses into a single file. Next, we are diving into variable fonts!
Variable fonts
Imagine if you could take all the separate files for light, regular, medium, and bold weights and squish them into a single, highly optimized flutter variable font file. That is exactly what a variable font does.
Instead of jumping in huge steps between separate files (like moving directly from weight 400 to 700), a variable font operates on a fluid, continuous range.
This technology lets you adjust values precisely down to the single digit, giving you absolute control over your project’s flutter font variations.
The Power of Design Axes
Variable fonts use design properties called axes. Instead of handling distinct style names, you tweak individual axis parameters. The most common standard options include:
- Weight (
'wght'): Adjusts the thickness anywhere from 1.0 up to 1000.0. - Slant (
'slnt'): Tilts the text along a fluid angle range. - Width (
'wdth'): Condenses or expands the characters horizontally.
Because all this data is packed into a single asset, you only need to register one single file path under your custom flutter font family settings inside your configuration file!
flutter:
  fonts:
    - family: PlayFair
      fonts:
        - asset: assets/fonts/Playfair-VariableFont.ttf
Code language: YAML (yaml)
Implementing fontVariations in Code
To control these fluid design lines, Flutter provides a specialized fontVariations list property inside the standard TextStyle widget configuration.
Let’s look at a complete, working example using our baseline practice layout. We will tweak the exact value of the weight axis to show off two completely custom thicknesses that don’t fit into standard static files:
class _HomeScreenState extends State<HomeScreen> {
  @override
  Widget build(BuildContext context) {
    return Scaffold(
      body: Center(
        child: Column(
          mainAxisAlignment: MainAxisAlignment.center,
          children: [
            Text(
              'Custom Weight 435',
              style: TextStyle(
                fontFamily: 'PlayFair',
                fontSize: 28,
                // Using precise font variation configurations
                fontVariations: [FontVariation('wght', 435.0)],
              ),
            ),
            SizedBox(height: 24),
            Text(
              'Heavy Weight 820',
              style: TextStyle(
                fontFamily: 'PlayFair',
                fontSize: 28,
                fontVariations: [FontVariation('wght', 820.0)],
              ),
            ),
          ],
        ),
      ),
    );
  }
}
Code language: Dart (dart)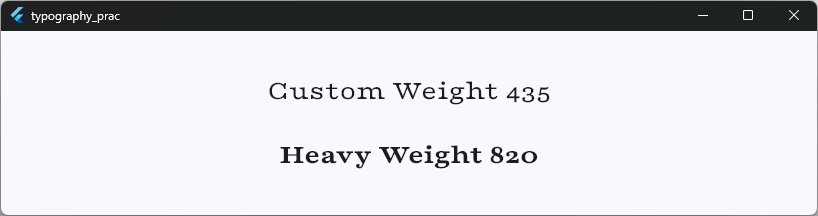
💡 A Helpful Update: In the latest versions of Flutter, the default
FontWeightengine properties have been completely upgraded to support continuous variable font numbers under the hood.You can now use custom values like
FontWeight.w650directly, and Flutter will map it to the'wght'axis automatically without making you manually declare aFontVariationproperty every single time!
Now that you know how to leverage modern, highly flexible font files, let’s step back and look at a critical topic that many developers overlook until it is too late: legal licensing protections!
Font licensing considerations
Before you publish your app to the Google Play Store or Apple App Store, there is one non-technical step you must take: you need to double-check your font licenses.
Just like code repositories, images, or music tracks, digital font files are intellectual property protected by legal copyright law.
Using a typeface without the proper legal authorization can lead to app store rejections, copyright notices, or even legal trouble for you or your client.
Let’s look at how to navigate font licensing safely.
Common Font Licenses
When you select a flutter font file for your commercial projects, it will usually fall under one of three main legal licenses:
- OFL (Open Font License): This is the gold standard for open-source digital typography. Most options on Google Fonts use this license. It allows you to use, modify, and bundle the files inside commercial apps completely free of charge.
- Apache 2.0: Another highly permissive open-source license. It allows free commercial use, but it requires you to include the original copyright notice and a copy of the license somewhere inside your software.
- Commercial / Proprietary Licenses: If you purchase a premium typeface from an independent design foundry, you receive a restrictive license. You must read the terms carefully. Foundries often sell separate licenses for desktop usage, websites, and mobile apps. A desktop license does not give you the right to embed the file inside a mobile app binary.
How to Document Licenses in Your App
If your custom typeface requires a copyright notice (like fonts under the Apache 2.0 or OFL licenses), Flutter makes it incredibly easy to display these details transparently.
The framework features a built-in LicenseRegistry tool. When you use the standard showAboutDialog widget inside your app, Flutter automatically scans this registry and displays the legal text beautifully for your users.
Here is a working code example showing how to register your typography license when your application boots up:
import 'package:flutter/foundation.dart';
import 'package:flutter/material.dart';

void main() {
  // Register your font license before the app launches
  LicenseRegistry.addLicense(() async* {
    yield const LicenseEntryWithLineBreaks(
      ['google_fonts', 'CustomFont'],
      'Copyright 2026 The CustomFont Project Authors. Licensed under the SIL Open Font License, Version 1.1.',
    );
  });

  runApp(const MyApp());
}

class MyApp extends StatelessWidget {
  const MyApp({super.key});

  @override
  Widget build(BuildContext context) {
    return MaterialApp(
      title: 'Typography Practice',
      debugShowCheckedModeBanner: false,
      theme: ThemeData(
        useMaterial3: true,
        colorSchemeSeed: Colors.blue,
        brightness: Brightness.light,
      ),
      home: const HomeScreen(),
    );
  }
}

class HomeScreen extends StatefulWidget {
  const HomeScreen({super.key});

  @override
  State<HomeScreen> createState() => _HomeScreenState();
}

class _HomeScreenState extends State<HomeScreen> {
  @override
  Widget build(BuildContext context) {
    return Scaffold(
      body: Center(
        child: ElevatedButton(
          onPressed: () {
            // Displays the default legal dialog box
            showAboutDialog(
              context: context,
              applicationName: 'Typography Masterclass',
              applicationVersion: '1.0.0',
            );
          },
          child: const Text('View App Licenses'),
        ),
      ),
    );
  }
}
Code language: Dart (dart)
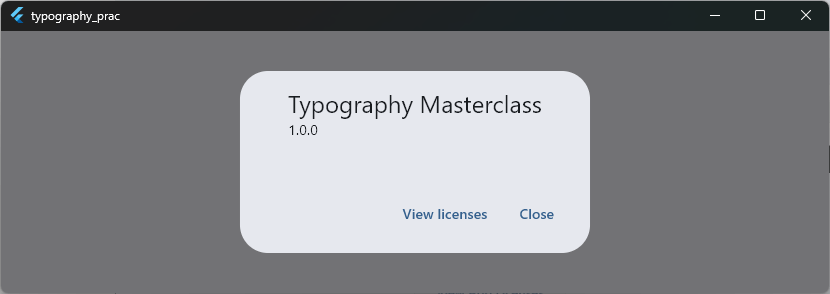
By adding a few quick lines to your initialization setup, you protect your digital project legally and respect the hard work of the type designers who built the characters.
Now that we have covered the design architecture and legal rules, let’s wrap up by looking at how to fix things when your typography breaks during development!
Troubleshooting fonts that don’t work
We have all been there. You set up your custom files, update your project settings, hit hot reload, and… nothing changes. Your text still looks like the standard flutter default font. Or even worse, your app crashes on startup!
When a flutter load font process fails, it is almost always due to a small configuration mismatch or caching issue. Here is a handy diagnostic checklist to help you fix broken typography fast.
The Debugging Checklist
1. You Hot Reloaded Instead of Restarting
Hot reload is great for tweaking widget code, but it does not re-bundle static project assets. When you add new asset files or edit your pubspec.yaml configuration, hot reload won’t load them into memory.
- The Fix: Stop your app completely and run a full cold restart (or execute
flutter runagain).
2. Spacing Misalignments in pubspec.yaml
YAML configuration files rely entirely on strict indentation. A single missing or extra space before - family: or - asset: will cause Flutter to skip your configuration entirely.
- The Fix: Open your configuration file and make sure your properties align perfectly:
flutter:
  fonts:
    - family: CustomFont          # Exactly 4 spaces
      fonts:
        - asset: assets/fonts/CustomFont-Regular.ttf # Exactly 8 spaces
Code language: YAML (yaml)
3. Case-Sensitivity & File Path Typos
File systems on iOS devices and Linux systems are strictly case-sensitive. If your file is named CustomFont-Regular.TTF on disk, but you wrote CustomFont-Regular.ttf in your configuration, the engine will fail to locate the file.
- The Fix: Compare your asset file paths letter-for-letter. Make sure the extensions (
.ttfor.otf) match the exact case of your physical files.
4. Font Family Name Mismatches
The string nickname you pass to fontFamily inside your TextStyle must match the string defined next to - family: in your configuration file.
- The Fix: Double-check your spelling:
// If pubspec.yaml has: - family: BrandSans

// ❌ WRONG (lowercase 'b')
style: TextStyle(fontFamily: 'brandSans')

// ✅ CORRECT
style: TextStyle(fontFamily: 'BrandSans')
Code language: Dart (dart)
Step-by-Step Recovery Sequence
If you checked all four items above and your text still isn’t rendering properly, follow these steps to reset your build environment:
1. Clean the build cache:Terminal command.
Open your project terminal and run flutter clean. This deletes the build/ folder and purges stale compiled assets.
2. Re-fetch package dependencies:Terminal command.
Run flutter pub get to rebuild your internal asset index and update dependencies.
3. Perform a full cold rebuild:IDE or Terminal.
Launch a fresh debugging session on your emulator or target device.
Wrapping Up & Next Steps
Mastering typography in Flutter is about much more than picking pretty typefaces. It is about building a clean, scalable architecture.
By knowing how to structure your asset paths, map font weights, leverage variable fonts, and set up global app themes, you give your applications a polished look that stands out.
If you found this guide helpful, check out related deep dives to continue building your development skills:
- Typography Guide — Learn design rules for establishing clear visual hierarchy.
- Responsive Typography — Scale text smoothly across phones, tablets, and desktop displays.
- Text Styling — Explore advanced properties like shadows, gradients, and custom painters.
- Flutter Themes — Build dynamic light and dark modes across your entire app.
Take Your Skills Further: In the course, you’ll implement complete design systems using custom fonts, themes, reusable widgets, and scalable architecture—not just isolated font examples.
Build Your First Flutter App with My Free Hands-On Class
You’ve already started learning Flutter. Take the next step with a free practical class where you’ll build a real app from scratch. Enter your email below for instant access.