Every time you create a new Flutter app, a handful of files automatically appear in your project folder. One of the most important ones is a file named pubspec.yaml.
If you are new to mobile development, looking at this file for the first time can feel a bit intimidating. It is full of strange spacing, words like “dependencies,” and strict formatting rules.
But don’t worry! In this guide, we have Flutter pubspec.yaml explained – everything beginners need to know (with real examples).
Think of this file as the control center or the brain of your entire app. It tells Flutter exactly what your app needs to run, what images it should load, and what external tools it should use.
If you don’t understand how it works, a single wrong space can break your whole project and leave you staring at frustrating build errors.
By the end of this post, you will know exactly what is pubspec.yaml, how its syntax works, and how to edit it without breaking your code. Let’s dive in and demystify this essential piece of your Flutter journey!
Build Your First Real Flutter App
Learn how Flutter works by creating a complete Android app from scratch. No prior Flutter experience required.
What is pubspec.yaml?
If you are building an app, you need a way to tell the computer how all the pieces fit together. That is exactly what the pubspec.yaml file does.
To understand what is pubspec yaml file in flutter, think of it as a master shopping list and instruction manual rolled into one.
When you define the purpose of pubspec.yaml, it comes down to managing your app’s metadata (information about your app) and its assets.
It is a configuration file written in YAML (which stands for YAML Ain’t Markup Language). This format is designed to be easy for both humans to read and computers to understand.
Here is a quick look at the core role of pubspec yaml in every project:
name: pubspec_yaml
description: "A new Flutter project."
version: 1.0.0+1

environment:
  sdk: ^3.12.2

dependencies:
  flutter:
    sdk: flutter
  cupertino_icons: ^1.0.8

dev_dependencies:
  flutter_test:
    sdk: flutter
  flutter_lints: ^6.0.0

flutter:
  uses-material-design: true
Code language: YAML (yaml)- App Identity: It states your app’s name, description, and current version.
- Third-Party Tools (Dependencies): If you want to use a package made by another developer—like a tool to handle camera access or save data—you list it here.
- Assets: It tells Flutter where to find your images, custom fonts, and audio files.
- SDK Limits: It defines which versions of Dart and Flutter your app is allowed to run on.
Without this file, Flutter would have no idea how to compile your app or where to find the resources it needs to display on a user’s screen. It is the very first file Flutter looks at when you press “Run.”
Why every Flutter project has pubspec.yaml
Every single Flutter project you create will always include this file.
But why is it so mandatory?
Why can’t we just write our Dart code and call it a day?
The main use of pubspec yaml in flutter is to act as the single source of truth for your app’s configuration.
Without it, your project would quickly turn into chaos. Here is why every project absolutely relies on it:
1. It is the bridge to the Flutter ecosystem
Flutter has a massive community of developers who share pre-made code packages on a website called pub.dev. If you want to add a feature—like a Google Map, a custom button, or a login system—you don’t have to build it from scratch.
You simply add that package to your pubspec.yaml file. Flutter reads the file, downloads the package for you, and makes it ready to use.
2. Computers need strict instructions
As developers, we know where we save our files. But Flutter is a machine; it doesn’t know you saved a cool background image in a folder named assets/images/ unless you explicitly state it.
The purpose of pubspec yaml file in flutter is to give the compiler a direct map to these resources. If it isn’t listed in this file, Flutter will completely ignore it when building your app.
3. It keeps your app stable
Apps grow and change over time. If you share your code with a friend or a teammate, they need to run the exact same version of Flutter and the same packages that you used.
Because this file records those exact version numbers, it ensures your app builds and runs the same way on every single computer.
Where to find pubspec.yaml
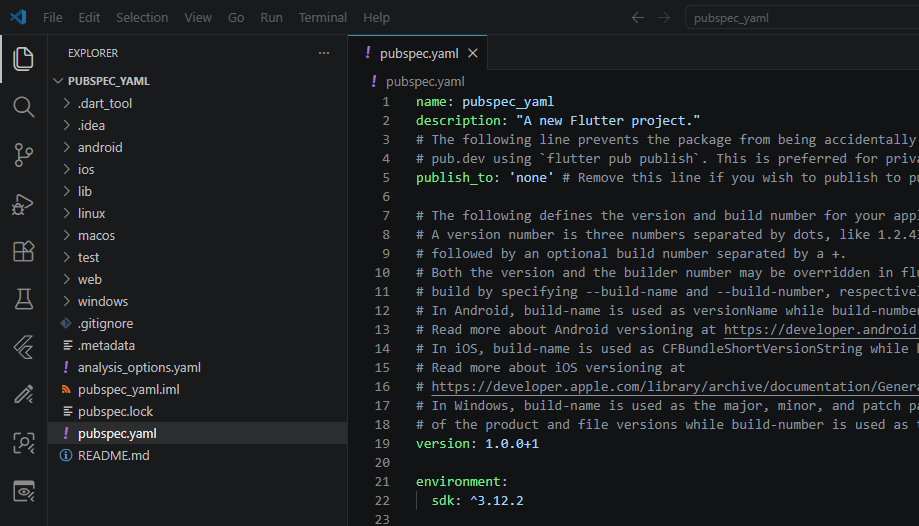
When you open a brand new project in your code editor (like VS Code or Android Studio), you will see a sidebar showing all your project files. This list of files is called your project tree.
Finding the pubspec yaml file flutter uses is easy because of one golden rule: it always lives at the very root of your project.
Where to Look in Your Sidebar
To open it, simply look at your file explorer on the left:
- Look at the very top-level folder of your project (this is the root directory).
- Scroll past folders like
android,ios, andlib. - Near the bottom of that main folder list, you will see
pubspec.yamlsitting right alongside other project-wide files like.gitignoreandREADME.md.
Watch out! Do not confuse it with
pubspec.lock. The.lockfile is something Flutter creates and manages automatically. You should never edit the.lockfile yourself. Always do your work insidepubspec.yaml!
pubspec.yaml file structure explained
Now that you know where to find it, let’s open the file and look inside.
At first glance, it might look like a random list of words, but it is actually highly organized. The pubspec yaml in flutter is divided into clear, logical sections. Each section has a specific job.
Here is a breakdown of the key parts you will find in a standard pubspec yaml file in flutter:
1. Project Metadata (The Identity Section)
This is located at the very top of the file. It tells Flutter and the rest of the world the basics about your app.
name: The name of your app (using lowercase letters and underscores, likemy_cool_app).description: A short sentence explaining what your app does.version: The current version of your app (e.g.,1.0.0+1).
2. Environment Section
This section acts as a gatekeeper for your code.
sdk: It specifies which version of Dart your code is compatible with. This ensures your app won’t run on outdated or unsupported software.
3. Dependencies (The Tools Section)
This is where the magic happens. It tells Flutter which external helper libraries your app needs to run.
dependencies: The packages your app needs to run on a user’s phone (like a database, camera controls, or a state management library).dev_dependencies: Packages you only need while you are writing and testing the code on your computer. These are not included when you publish the app to the App Store or Google Play.
4. Flutter Configuration Section
This section starts with the line flutter: and is where you configure Flutter-specific features.
uses-material-design: Usually set totrueso you can use Google’s standard Material icons and widgets.assets: A list of all your local images, videos, and JSON files that need to be packaged inside your app.fonts: A list of custom typography files so you can use unique text styles.
Understanding indentation and YAML syntax
Writing in a pubspec.yaml flutter file is different from writing standard Dart code. There are no semicolons, no curly braces, and no parentheses.
Instead, YAML uses a clean, visual layout based entirely on spaces.
Because of this, understanding pubspec yaml format rules is the most important skill for a beginner. The layout works on a simple concept: Key-Value Pairs and Indentation.
Key-Value Pairs
Every line of data in a pubspec yaml syntax layout is written as a label (the key) followed by a colon and a space, and then the data (the value).
name: my_awesome_app
description: "A brand new Flutter application."
Code language: YAML (yaml)
The Golden Rule: Always put a space after the colon. Writing
name:my_awesome_appwill cause a syntax error.
The Power of Two Spaces
YAML figures out how data is grouped by looking at how far it is indented from the left margin. In Flutter, the standard rule is to use exactly two spaces for each new sub-level.
Think of it like an outline:
flutter:
  uses-material-design: true
  assets:
    - assets/images/logo.png
Code language: YAML (yaml)
In this example:
flutter:is the main parent section. It starts at the very edge (zero spaces).uses-material-design:andassets:belong inside the flutter section, so they are pushed in by two spaces.- The actual image path belongs inside the assets list, so it is pushed in by four spaces and starts with a dash (
-).
Never Use the Tab Key
This is the trap that catches almost every beginner: never use the Tab key to create spaces in a YAML file.
Your code editor might look like it added regular spaces, but the compiler will see the hidden “Tab” character and crash your build.
Always press the Spacebar manually, or configure your code editor to convert tabs to spaces automatically!
Required vs optional fields
When you look at a flutter default pubspec yaml file, it comes pre-filled with quite a few lines of text. However, you don’t actually need to use all of them for your app to work.
To keep your configuration clean, it helps to know which fields are absolutely mandatory and which ones you can safely skip or delete.
The Required Fields
If you delete any of these fields, Flutter will throw an error immediately because it won’t have enough information to build your app.
name: Every app must have an internal identifier. It must use lowercase letters, numbers, and underscores only.environment: You must specify the Dart SDK version constraints. This tells Flutter, “This code is written for Dart version X, so don’t try to run it on version Y.”dependencies: Even if you don’t add any third-party packages, this section is required because it must at least list theflutterSDK itself so your app can access basic widgets.
The Optional Fields
These fields are nice to have, but your app will still compile perfectly fine if you leave them out.
description: While highly recommended (especially if you plan to publish your package on pub.dev), Flutter doesn’t actually need a description to run your app locally.version: You can technically remove this during early development, though you will absolutely need it later when you are ready to push updates to the app stores.homepage/repository/documentation: These are fields used by developers who are publishing reusable plugins for the community. If you are just building a standalone mobile app for yourself or a client, you can skip these entirely.assetsandfonts: You only need to include these sections inside theflutter:block if your app actually uses local images or custom typography.
The most common beginner mistakes
Because the pubspec yaml format is so strict, almost every new developer runs into the same handful of errors. A single mistyped character can halt your entire project.
By keeping an eye out for these common slip-ups, you can save yourself hours of head-scratching troubleshooting.
1. The Missing Space After Colons
As we mentioned earlier, YAML keys and values must be separated by a colon and a space.
- Wrong:
dio:^5.0.0 - Right:
dio: ^5.0.0
Without that tiny space, Flutter reads the entire line as a single, confusing word instead of a package name and its version.
2. Bad Indentation (The 3-Space Trap)
Flutter expects exactly two spaces per indentation level. If you accidently press the spacebar three times or four times on a line where it doesn’t belong, you will get a vague “parsing error” when you try to run your app.
3. Misaligning Asset Paths
When you add images to your app, your path must perfectly align with the assets: keyword above it, and it must start with a hyphen and a space.
# Wrong
flutter:
  assets:
  - assets/logo.png  # Missing the 2-space indentation under assets

# Right
flutter:
  assets:
    - assets/logo.png
Code language: YAML (yaml)
4. Forgetting to Run flutter pub get
Whenever you make a change to your dependencies, your code editor needs to download those new tools.
If you simply type the package name into the file and immediately try to use it in your Dart code, you will see red squiggly lines everywhere.
You must save the file or manually run flutter pub get in your terminal to tell Flutter to pull down the updates.
Complete pubspec.yaml example
To see how all these pieces fit together, let’s look at a realistic flutter pubspec yaml example.
This example shows a clean, modern setup.
It includes basic project information, a couple of popular packages for web requests (dio) and local storage (shared_preferences), and a properly formatted assets section.
name: sensei_recipe_app
description: "A beautiful cooking app built for the FlutterSensei tutorial."
publish_to: 'none' # Remove this line if you wish to publish to pub.dev

version: 1.0.0+1

environment:
  sdk: ^3.12.2

dependencies:
  flutter:
    sdk: flutter
  cupertino_icons: ^1.0.8
  # Third-party packages for networking and data storage
  dio: ^5.10.0
  shared_preferences: ^2.5.5

dev_dependencies:
  flutter_test:
    sdk: flutter
  flutter_lints: ^6.0.0


flutter:
  uses-material-design: true

  # Registering local assets for the app to use
  assets:
    - assets/images/pancake_breakfast.jpg
    - assets/images/logo/
Code language: YAML (yaml)
Key Takeaways from This Example:
- The Version Constraints: The
^3.5.0syntax in the environment section means this app will work with Dart version 3.5.0 or any newer, non-breaking updates. - Asset Directories: Look at the very last line:
- assets/images/logo/. By ending the path with a forward slash (/), we are telling Flutter to include every single image inside that folder all at once, instead of typing them out one by one!
How Flutter reads pubspec.yaml
Ever wonder what actually happens behind the scenes when you save your configuration changes? Flutter doesn’t just read this file while your app is running on a phone.
Instead, it processes the file on your computer beforehand to build a structural blueprint of your project.
Here is the step-by-step pipeline of how Flutter translates your text into a working application:
Step 1: Parsing the YAML Structure
When you run a command or save the file, Flutter uses an internal parsing tool to read your layout. It checks the lines, ensures your two-space indentations are perfect, and translates the text into a format the computer can process.
If it finds a rogue tab or bad spacing, the process stops immediately and throws an error.
Step 2: Resolving Dependencies via Pub
Once the file is verified, Flutter looks at your dependencies section. It contacts Pub (the package manager ecosystem for Flutter and Dart).
Pub checks the version numbers you requested, downloads those libraries from the internet, and stores them in a central cache directory on your computer.
Step 3: Generating the Lock File
After downloading the packages, Flutter automatically creates or updates a file called pubspec.lock.
What is the lock file? Think of
pubspec.yamlas your dynamic request list, andpubspec.lockas the final receipt. The lock file records the absolute exact version numbers of every single package and sub-package that was downloaded.This guarantees that if someone else opens your project, they will download the exact same code versions, keeping the app completely stable across different computers.
Step 4: Creating the Asset Manifest
Finally, Flutter looks at your assets section. It verifies that the folders and images you listed actually exist in your project. It then builds a hidden checklist called an asset manifest.
When your app is compiled into a final package for iOS or Android, Flutter uses this manifest to bundle your images directly into the application file so they can load instantly on a user’s screen.
Best practices
To close out our guide, let’s look at the industry standards for keeping your file clean, safe, and professional. Following these core rules will keep your development workflow smooth and prevent unexpected bugs down the road.
1. Organize with Clear Comments
As your app grows, you will add dozens of packages. Use the # symbol to create clear comment labels to group your tools by category.
dependencies:
  flutter:
    sdk: flutter

  # State Management
  riverpod: ^2.5.0

  # Networking & API
  dio: ^5.7.0
Code language: YAML (yaml)
2. Keep Version Numbers Updated (and Understand caret syntax)
The caret symbol (^) before a version number (like ^5.7.0) tells Flutter: “It is safe to update this package automatically, as long as it doesn’t include massive, breaking changes.”
- Every few months, check your dependencies against pub.dev to ensure you are running modern, secure versions of your favorite tools.
- Avoid leaving the version space completely blank (e.g.,
dio:), as this forces Flutter to pull down whatever random version it finds first, which can easily break older code.
3. Keep Your Asset Folders Consistent
Pick a structured folder pattern inside your main project directory and stick to it. A popular and clean setup looks like this:
my_project/
  └── assets/
      ├── images/
      ├── icons/
      └── fonts/
Matching this clean layout inside your pubspec.yaml will ensure you never get lost trying to find an image asset pathway.
What’s Next on Your Flutter Journey?
After understanding pubspec.yaml, the next challenge is learning how Flutter projects actually fit together. In my Flutter Implementation Class, you’ll build complete apps while learning where every configuration file belongs instead of memorizing isolated concepts.
Start Learning Flutter the Right Way
You’ve finished this guide. If you’d like to keep learning, start with the free class or jump straight into the complete Foundation Course.