Hey there! Building a beautiful app in Flutter is an amazing feeling, but nothing frustrates a user faster than navigation that feels broken or clunky.
We’ve all been there: you tap a button, head to a new screen, and suddenly you’re trapped because the back button disappeared—or worse, it takes you somewhere completely unexpected.
The secret to a flawless user experience lies right at the top of your screen: the Flutter AppBar. It handles everything from automatic back arrows to custom menus, acting as the ultimate traffic controller for your app.
In this ultimate guide, we are going to break down how to master Flutter AppBar navigation. You will learn how to handle back buttons automatically, customize your leading widgets, and keep your route control perfectly smooth.
Let’s make your app’s navigation feel like second nature!
Take the Next Step in Your Flutter Journey
Ready to see how all these pieces fit together? Sign up for our free mini class to move past isolated code snippets and start building complete, multi-screen real-world apps step by step.
How Flutter Automatically Creates Back Buttons
Flutter is incredibly smart when it comes to keeping track of your app’s screens. It uses a stack system to manage your pages. Think of it like a stack of pancakes: when you open a new screen, Flutter pushes it right on top of the old one.
Because of this stack, Flutter knows exactly when a user can go backward. If you use Navigator.push to move to a new screen, Flutter automatically adds a flutter appbar back button for you.
onPressed: () {
  // Opening a new screen looks like this
  Navigator.push(
    context,
    MaterialPageRoute(builder: (context) => const DetailScreen()),
  );
},
Code language: Dart (dart)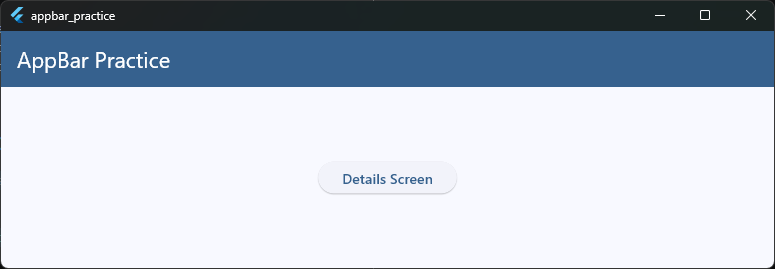
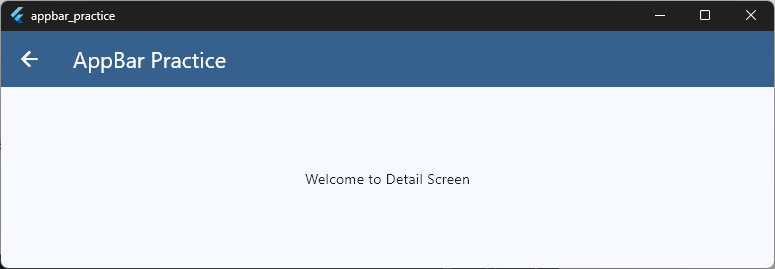
As soon as this new screen loads, the AppBar looks at the navigation stack. It sees that there is another screen sitting right beneath it.
To help your user get back, Flutter automatically injects a flutter appbar leading back button (the classic back arrow) into the top-left corner.
You don’t have to write a single line of code to make that arrow appear or function. If a user taps it, Flutter automatically pops the top screen off the stack and takes them right back to where they started.
Understanding automaticallyImplyLeading
So, how does the AppBar know when to look for that navigation stack? It all comes down to a handy little property called flutter appbar automaticallyimplyleading.
By default, this property is set to true. This means Flutter will actively check if it should show a back button or a drawer icon in the flutter appbar leading slot.
Here is what happens behind the scenes:
- When it is true: Flutter checks if there is a previous page in the stack. If it finds one, it automatically shows the back arrow.
- When it is false: Flutter completely stops guessing. It turns off the automatic behavior entirely.
If you turn it off, the AppBar will leave that top-left space completely blank, even if there is a page to go back to.
appBar: AppBar(
  title: const Text('AppBar Practice'),
  backgroundColor: theme.colorScheme.primary,
  foregroundColor: theme.colorScheme.onPrimary,
  automaticallyImplyLeading: false,
  // Disables the automatic back button
),
Code language: Dart (dart)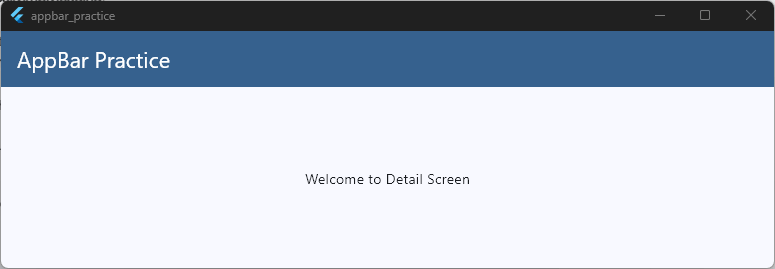
Understanding this property is the key to controlling your app’s layout. It prevents Flutter from forcing a back button onto a screen where you don’t want one.
Removing the Back Arrow Correctly
Sometimes, you simply do not want that back arrow to show up. Maybe you are building a custom login flow, a success screen, or a dashboard where going backward doesn’t make sense.
If you want to achieve a flutter appbar no back button look, the cleanest way to do it is by using the property we just talked about.
To remove back arrow from appbar flutter, you just need to set automaticallyImplyLeading to false. This tells Flutter to leave the leading slot empty.
Here is the exact code to flutter appbar hide back button:
appBar: AppBar(
  title: const Text('Dashboard'),
  backgroundColor: theme.colorScheme.primary,
  foregroundColor: theme.colorScheme.onPrimary,
  automaticallyImplyLeading: false,
  // This hides the back button safely
),
Code language: Dart (dart)
Why You Shouldn’t Just Cover It Up
A common mistake beginners make when trying to remove back icon from appbar in flutter is trying to cover it up with an empty Container() or a SizedBox() in the leading slot.
While that can hide the icon, it doesn’t actually stop the underlying navigation logic, and it can leave weird spacing in your layout.
Using automaticallyImplyLeading: false is the absolute best practice. It completely clears the space, giving you a clean slate to work with.
Custom Back Button Behavior
There are times when you want the back arrow to stay, but you need it to do something extra before it takes the user back.
For example, you might want to show a confirmation dialog asking, “Are you sure you want to discard your changes?”
To create a flutter appbar custom back button, you can override the default action. To do this, you pass a custom widget—like an IconButton—directly into the leading slot.
This lets you flutter appbar override back button behavior entirely.
Here is how you can intercept the tap and trigger your own custom logic:
appBar: AppBar(
  title: const Text('Edit Profile'),
  backgroundColor: theme.colorScheme.primary,
  foregroundColor: theme.colorScheme.onPrimary,
  leading: IconButton(
    icon: const Icon(Icons.arrow_back),
    onPressed: () {
      // 1. Put your custom logic here (e.g., save data or show a dialog)
      print('Custom back button tapped!');

      // 2. Then, manually pop the screen when you are ready
      Navigator.pop(context);
    },
  ),
),
Code language: Dart (dart)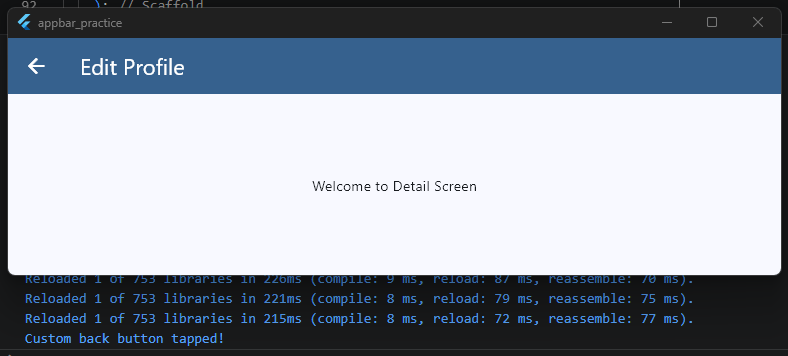
By providing a widget to the leading slot, Flutter automatically stops using its default back button and hands full control over to you.
Pro Tip: If you want to block the physical back button on Android devices as well as the AppBar button, make sure to look into Flutter’s
PopScopewidget to wrap your entire screen.
Replacing the Back Icon
You don’t have to stick with the default arrow icon that Flutter gives you out of the box. Matching your navigation icons to your app’s unique brand or design language is a great way to polish your user interface.
If you want to swap out the standard arrow for something else—like a close “X” icon or a completely custom graphic—you will use the flutter appbar leading icon slot.
Here is the straightforward way to change your flutter appbar leading visual while keeping the normal back-button functionality intact:
appBar: AppBar(
  title: const Text('Settings'),
  backgroundColor: theme.colorScheme.primary,
  foregroundColor: theme.colorScheme.onPrimary,
  leading: IconButton(
    icon: const Icon(Icons.close),
    // Swaps the arrow for a close icon
    onPressed: () {
      Navigator.pop(context);
      // Keeps the standard back behavior
    },
  ),
),
Code language: Dart (dart)
By providing your own icon inside the leading property, Flutter drops its default arrow and renders your custom choice instead.
Just remember: whenever you manually set the leading widget, you must also provide the onPressed callback with Navigator.pop(context) so your users can actually still go backward!
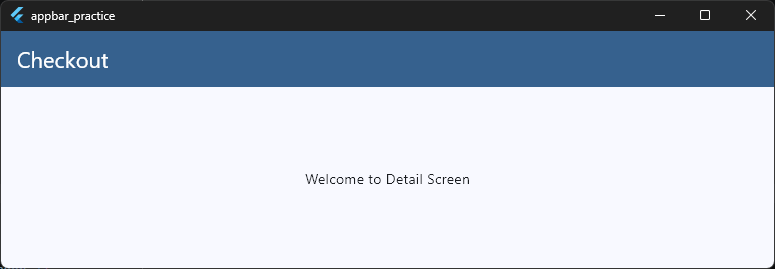
Hiding Navigation Safely
Sometimes you need to hide the navigation options completely to create a focused, distraction-free environment. Think of splash screens, onboarding flows, or checkout pages.
In these scenarios, you want to prevent users from accidentally navigating away.
To achieve a clean flutter appbar hide back button layout safely, you must handle both the UI and the underlying navigation stack correctly.
Step 1: Hide the UI Button
First, stop the AppBar from automatically generating the back button by setting automaticallyImplyLeading to false.
appBar: AppBar(
  title: const Text('Checkout'),
  backgroundColor: theme.colorScheme.primary,
  foregroundColor: theme.colorScheme.onPrimary,
  automaticallyImplyLeading: false,
  // Removes the visual back button
),
Code language: Dart (dart)
Step 2: Clear the Routing History
Hiding the visual button is only half the battle. If a user presses the physical back button on an Android device, or uses swipe gestures on iOS, they might still navigate backward.
To hide navigation safely, you should replace the current route in the history instead of pushing a new one on top of it. Use Navigator.pushReplacement instead of Navigator.push.
child: ElevatedButton(
  onPressed: () {
    // This replaces the old screen completely, removing it from the history stack
    Navigator.pushReplacement(
      context,
      MaterialPageRoute(builder: (context) => const DetailScreen()),
    );
  },
  child: const Text('Details Screen'),
),
Code language: Dart (dart)
By combining automaticallyImplyLeading: false with route replacement, you safely lock down the screen. This ensures your users stay exactly where they need to be.
Navigation Patterns Beginners Should Avoid
When you are first figuring out flutter appbar navigation, it is easy to fall into a few common traps. While Flutter gives you a ton of flexibility, some approaches can quickly break your app’s flow or mess up your layouts.
Here are the top three navigation anti-patterns to stay away from:
1. Hardcoding the Back Button Destination
Never hardcode a specific route into your back button’s onPressed method like this:
appBar: AppBar(
  title: const Text('Checkout'),
  backgroundColor: theme.colorScheme.primary,
  foregroundColor: theme.colorScheme.onPrimary,

  // AVOID THIS PATTERN
  leading: IconButton(
    icon: const Icon(Icons.arrow_back),
    onPressed: () => Navigator.pushNamed(context, '/home'),
    // Don't do this!
  ),
),
Code language: Dart (dart)
Why it’s bad: This doesn’t actually take the user “back”—it pushes a brand new copy of the Home screen onto the top of your stack.
If a user keeps hitting back, they will get stuck in an endless loop of screens. Always use Navigator.pop(context) to properly slide the current screen off the stack.
2. Overcrowding the Leading and Trailing Slots
The AppBar has two main areas for buttons: leading (the top-left) and actions (the top-right). Beginners sometimes try to cram multiple buttons or complex layouts into the flutter appbar leading and trailing spaces.
Why it’s bad: The leading slot is designed for a single icon or button.
Trying to squeeze multiple widgets in there will break the app’s alignment, throw off your spacing, and make it incredibly difficult for users to tap the right button on a mobile screen.
Keep leading simple, and use actions for secondary buttons.
3. Forgetting the Physical Back Button
It is easy to focus entirely on making the flutter appbar back button look perfect on your screen while totally forgetting about hardware buttons (like the back button on Android) or edge-swipe gestures on iOS.
Why it’s bad: If you change the behavior of your AppBar’s back button but don’t protect the rest of the screen, a user can still exit the page using a system gesture.
If you need to intercept navigation, always couple your AppBar changes with a PopScope widget to handle system-level back events seamlessly.
AppBar with Drawer Navigation
If your app has a lot of top-level sections, a side menu is a great way to keep things organized. This is where a side drawer comes in perfectly.
When you add a side menu to your screen, the flutter appbar drawer logic kicks in automatically.
If you assign a Drawer widget to your Scaffold, Flutter is smart enough to swap out the default back arrow and display a “hamburger” menu icon instead.
Here is how simple it is to set up:
return Scaffold(
appBar: AppBar(
title: const Text('Main Menu'),
// You don't need to manually add a menu button!
backgroundColor: theme.colorScheme.primary,
foregroundColor: theme.colorScheme.onPrimary,
),
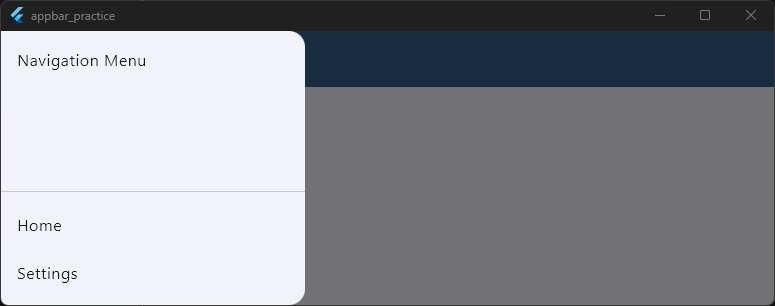
drawer: Drawer(
child: ListView(
children: const [
DrawerHeader(child: Text('Navigation Menu')),
ListTile(title: Text('Home')),
ListTile(title: Text('Settings')),
],
),
),
);
Code language: Dart (dart)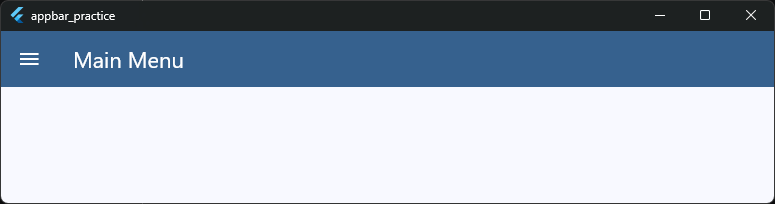
Just like with back buttons, Flutter relies on automaticallyImplyLeading: true to make this happen.
It detects the drawer and automatically configures the flutter appbar leading slot to open it when tapped.
Want to learn more about setting up side menus?
If you want to build a complete, fully functional sidebar, check out our deep-dive Flutter Drawer Navigation Tutorial to learn how to connect your drawer items to different screens.
Handling Nested Navigation
As your app grows, you might find yourself needing a screen that has its own internal navigation—like a dashboard with a persistent bottom navigation bar.
This is called nested navigation. It means you have a mini navigation stack running inside a larger navigation stack.
Managing the flutter appbar navigation when you have a stack inside a stack can get a little tricky.
If you aren’t careful, hitting the back button might pop the entire dashboard off the screen instead of just going back one step inside your sub-menu.
The Solution: Using Nested Navigators
To handle this safely, Flutter allows you to place a secondary Navigator widget inside your widget tree. Each nested navigator maintains its own independent history.
Handling Nested Navigation
As your app grows, you will likely run into scenarios where you need a persistent UI element—like a bottom navigation bar or a persistent split-screen layout—while navigating through sub-screens. This is called nested navigation.
When you navigate inside a sub-screen, managing the flutter appbar navigation stack can get a bit tricky.
If you just use the standard root navigator, tapping a button might push a new screen over your entire app, completely hiding your bottom navigation bar!
The Problem: Conflicting Navigators
By default, Navigator.of(context) looks for the very top navigator in your app widget tree. If you push a new page there, it takes over the whole screen.
When that happens, the flutter appbar back button on the new screen will pop you all the way out of the nested flow, instead of just taking you back one step inside your sub-tab.
The Solution: Nested Navigators or Modern Routing
To handle this smoothly, you have two great options:
- Using a Nested Navigator Widget: You can embed a local
Navigatorwidget inside the body of your mainScaffold. This local navigator maintains its own isolated history stack. When you callNavigator.push()inside this specific section, it only changes the content area, leaving your outer layout untouched. - Using Declarative Routing (Recommended): For modern production apps, managing multiple imperative navigation stacks manually becomes complex very quickly. Using a package like
GoRoutermakes handling nested, tab-based navigation significantly cleaner by utilizing declarative state-based routing.
// Example of pushing a route within a nested context using GoRouter
context.go('/home/details');
Code language: Dart (dart)
If you are just getting started with complex architectures, check out our comprehensive Flutter Navigator 2.0 Beginner Guide
Or dive straight into our production-ready Flutter GoRouter Tutorial to see exactly how to implement nested routing without tearing your hair out.
Navigation UX Best Practices
Writing clean code is only half the battle. Your navigation also needs to feel intuitive to the real humans using your app every day.
Good navigation UX (User Experience) keeps users moving forward effortlessly, while poor UX leaves them feeling lost or frustrated.
Keep these three fundamental rules in mind to keep your app user-friendly:
1. Maintain Predictable Back Button Behavior
Your user should always know exactly where the flutter appbar back button will take them. When a user taps “back,” they expect to return to the exact screen they were looking at just a moment ago.
- The Rule: Don’t hijack the back button to show random screens. If you want to jump across entirely different sections of your app, use a dedicated menu or explicit deep links instead.
- Learn more about setting up proper path structures in our Flutter Named Routes Explained guide.
2. Match Native Platform Patterns
iOS and Android users expect apps to behave the way their phone’s operating system does.
- Android users are accustomed to clicking a dedicated physical back button or using a hard back-swipe gesture anywhere on the screen edge.
- iOS users expect a smooth swipe-from-left gesture to pop the current page off the stack.
When you customize your flutter appbar navigation, make sure you do not accidentally disable these native system gestures.
Keep them enabled unless it is completely necessary to block them (like during a critical checkout process).
3. Keep Targets Large and Tappable
Mobile screens are small, and fingers aren’t always perfectly precise. If your back button or menu icon is tiny, users will get annoyed trying to tap it repeatedly.
Always ensure your top-left navigation buttons have an adequate touch target size.
The standard rule of thumb is a minimum interactive area of 48×48 logical pixels. Flutter’s built-in IconButton handles this padding for you automatically, so try to use it whenever possible!
Master Navigation in Real-World Apps
Isolated navigation tutorials only get you so far. To bridge the gap between simple back buttons and complex, multi-screen real-world applications, you need a systematic, hands-on approach.
You can take your skills to the next level by learning the way production apps are actually engineered.
Learn Flutter the Way Real Apps Are Built
Now that you understand professional Flutter AppBar navigation, routing logic, and back button mechanics, it’s time to apply those concepts in a real app. Join the free mini class and start building cleaner, more organized Flutter projects step by step.